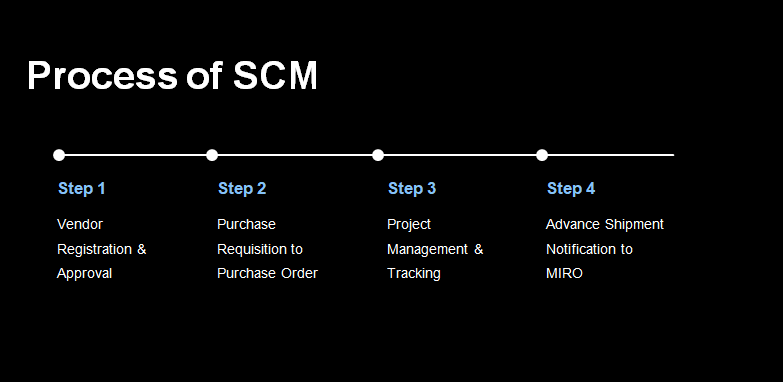
Process of SCM
Hoicko.com is an advanced no-code app platform that empowers users to effortlessly manage data. With its intuitive drag-and-drop interface, professionals can create and customise web and mobile apps tailored to their exact needs. Choose from a variety of pre-built templates or build custom modules to streamline operations and gain valuable insights for enhanced business performance. Experience the power of simplified app creation with Hoicko.com, where coding is no longer a barrier to success.
Product Demonstration
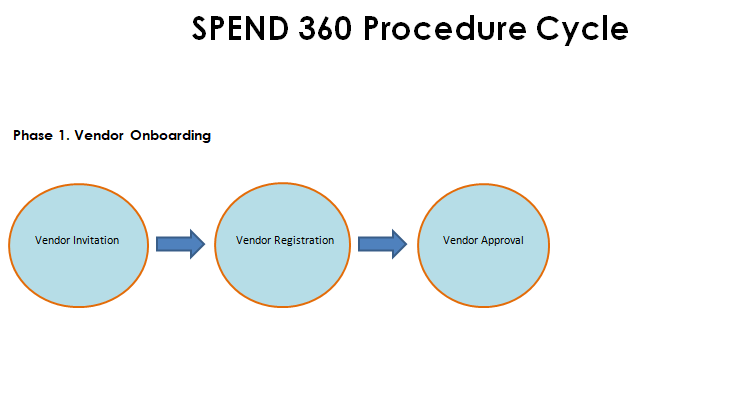
Introduction about Vendor Registration and Login to vendor portal
Click on the link for the video: https://youtu.be/kIQwkEcrokU
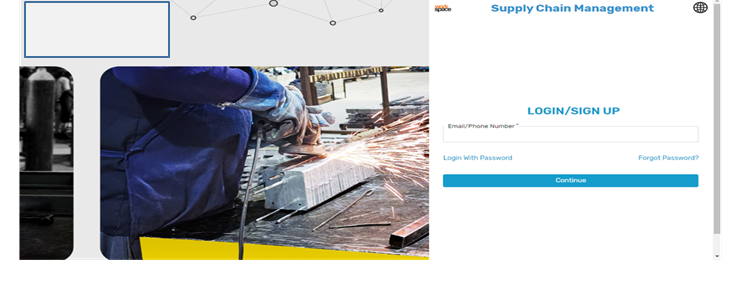
Log in with the vendor portal:
- Admins need to Enter email and password to log in.
- A user can log in with Email and Password or through OTP on the registered email and mobile Number
Introduction about Vendor Registration and Login to vendor portal:
Here only the Admin can add vendors and members of the organisation.
Add Vendors:
- 3. Click on the Add New to add Vendor
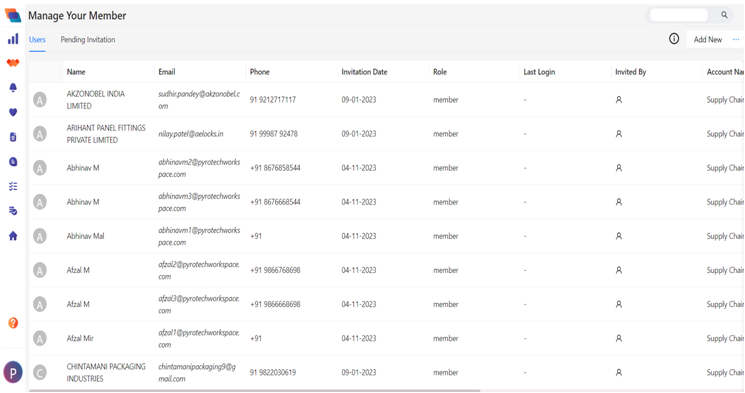
- Fill in the vendor details.
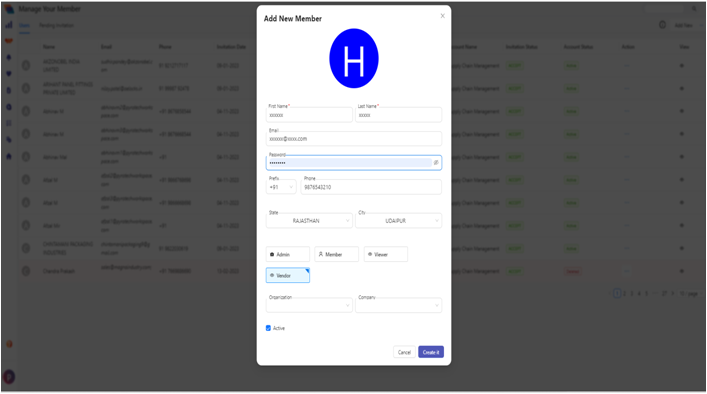
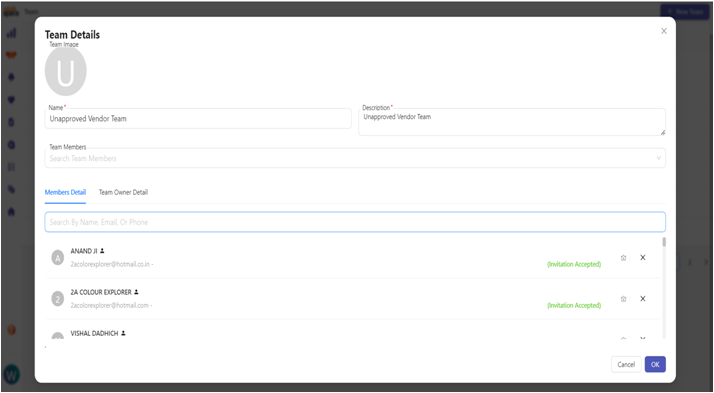
- Go to the teams.
- Choose the unapproved team and add the new vendor to this team.
Now, after registering, the new vendor received a welcome email, then clicked on the login link given in the email.The Vendor Login with Email and OTP.
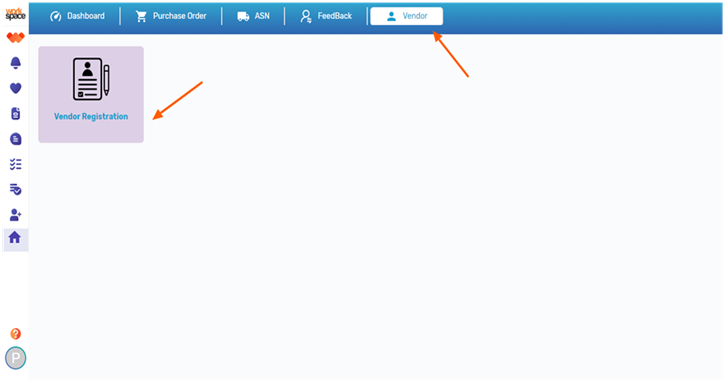
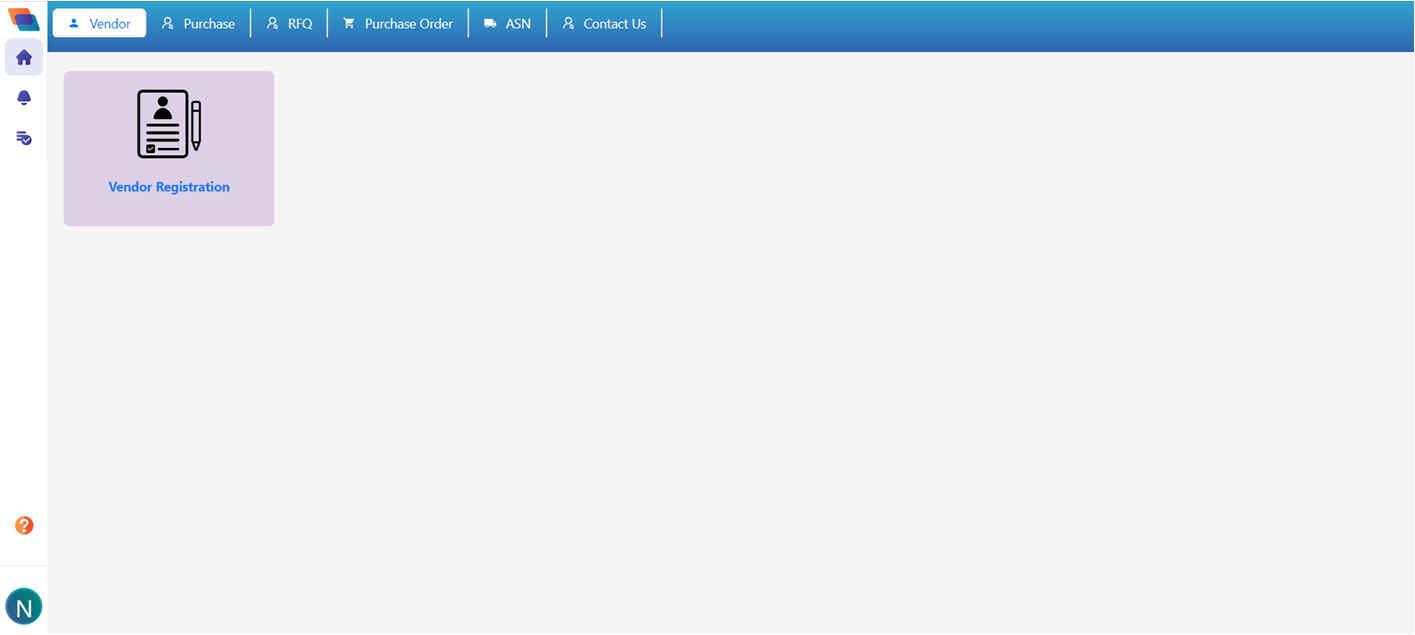
Vendor Side, Vendor Registration
- Click on the My Portal.
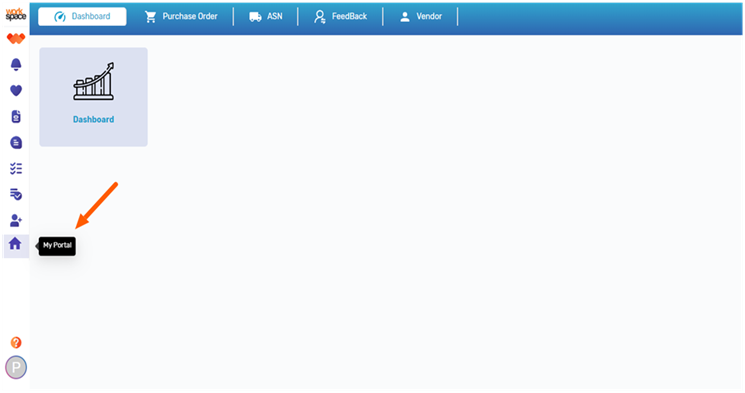
- These tiles will seen by the registered vendor
- Click on the Vendor and go to the Vendor registration tiles.
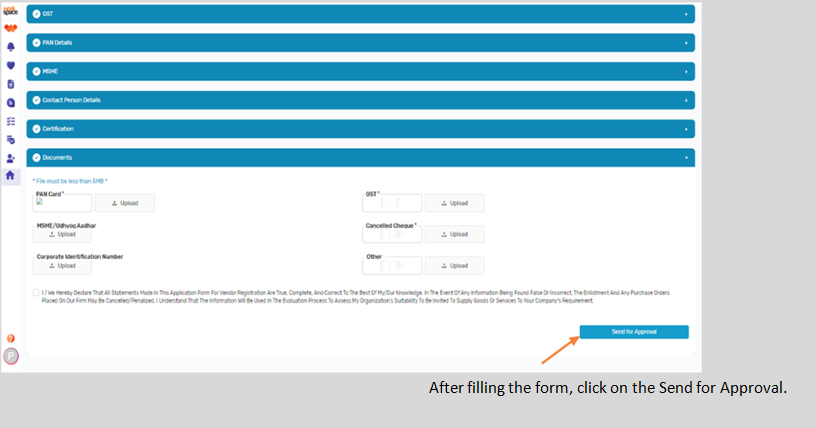
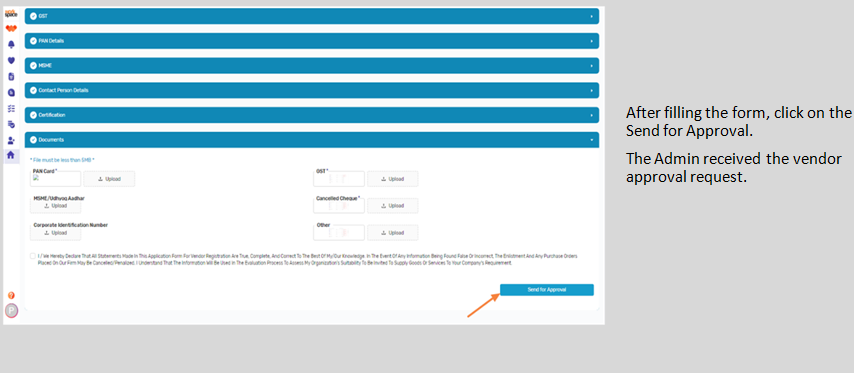
- Fill in all the details by Vendor with all mandatory fields.
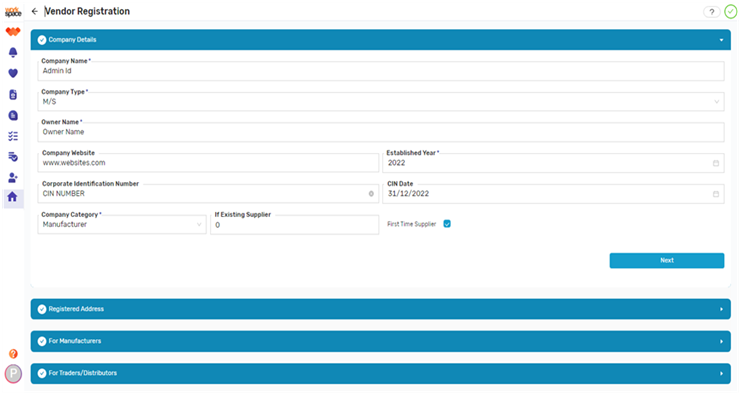
Vendor Registration form fill:
Here are few process screenshot of vendor registration.

This process done by admin only.
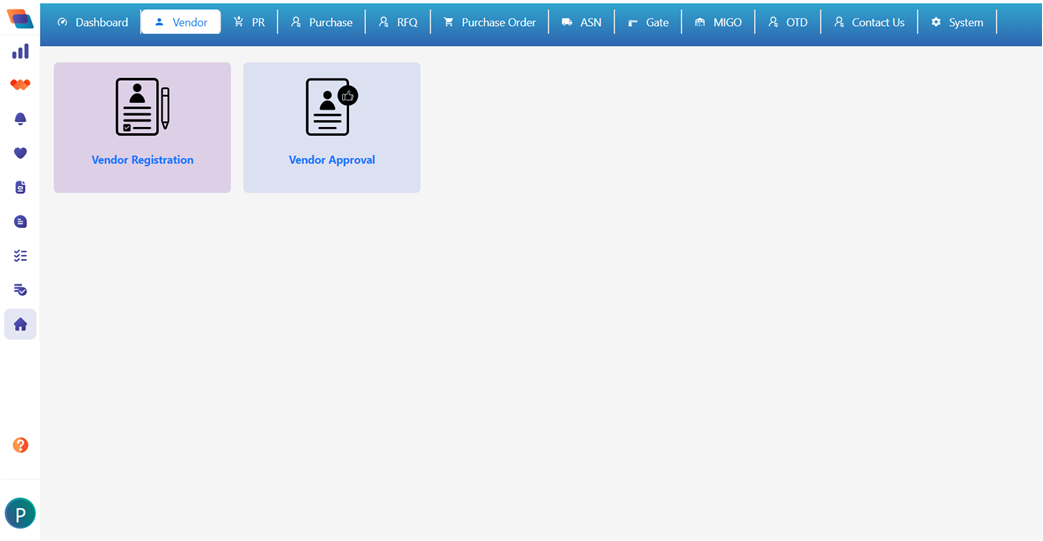
1. Admin goes to My Portal and clicks on the Vendor Tile.
2. Here the admin can see the two sub-tile names, Vendor Registration and Vendor Approval.
3. For Approve a vendor, click on the vendor approval tile.
NOTE:
Vendor Registration, The admin has the right to fill out vendor registration if the admin has all vendor details.
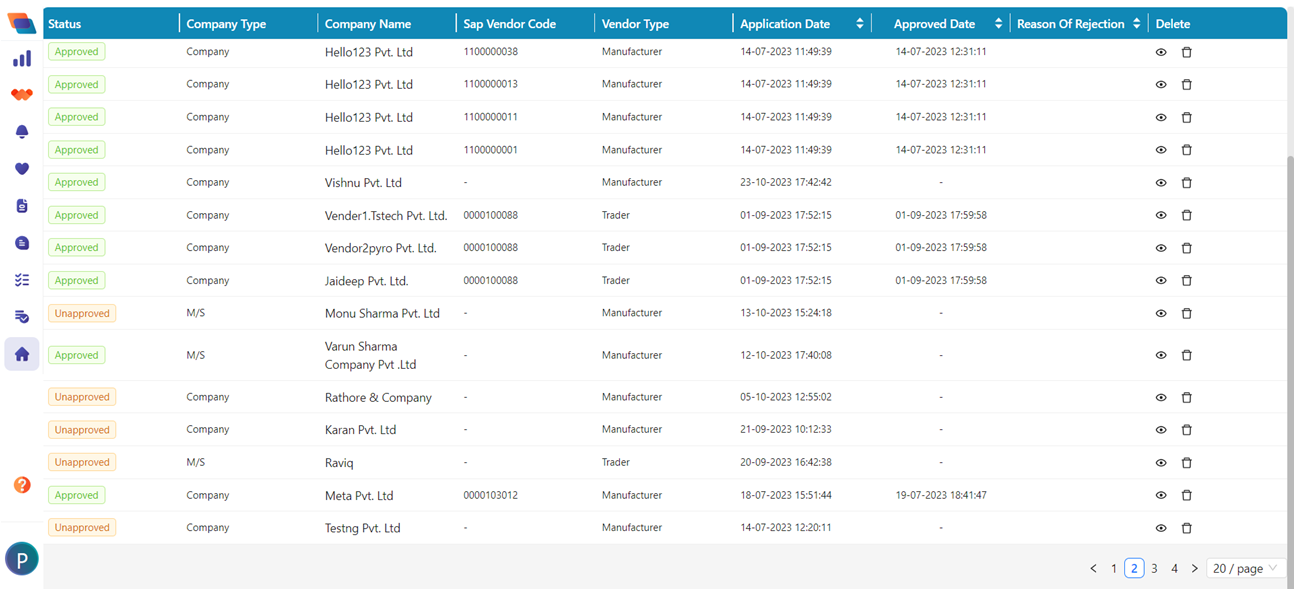
- In the Vendor Approval tile there are list of Vendors
- Here you can see the status of the vendor as Approved, Unapproved and Reject.
- Click on the Eye button and check all the details filled by the vendor.
- Once you click on the eye button, the vendor details are shown.
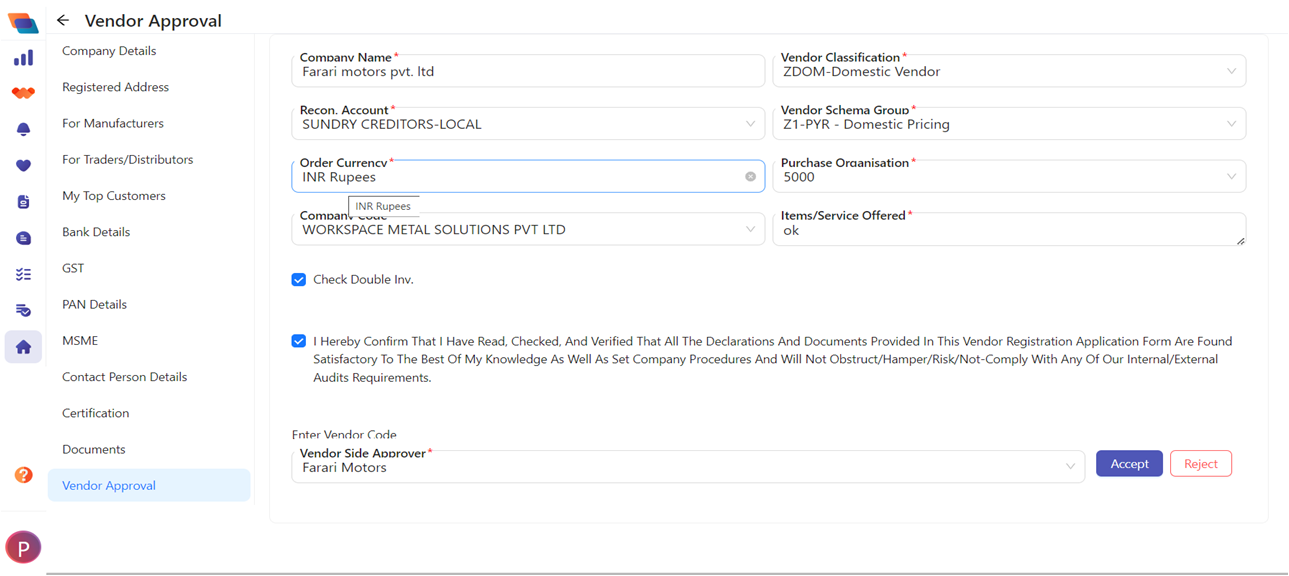
- Admin check all the details and at the last the admin ACCEPT or REJECT the Vendor Approval, and the status
- After the vendor was approved, a Vendor Code has been generated through SAP.
- Once the vendor code has been generated, the vendor received the confirmation notification
Once the Vendor get approval from admin, the tiles are sent to the vendor.
This is how Vendor Registration and Vendor Approval Process occurred
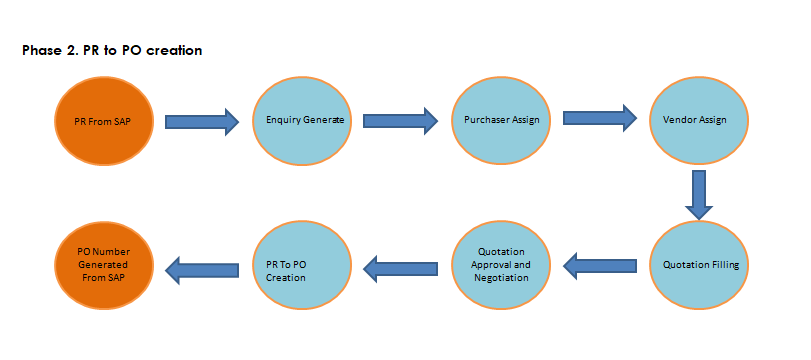
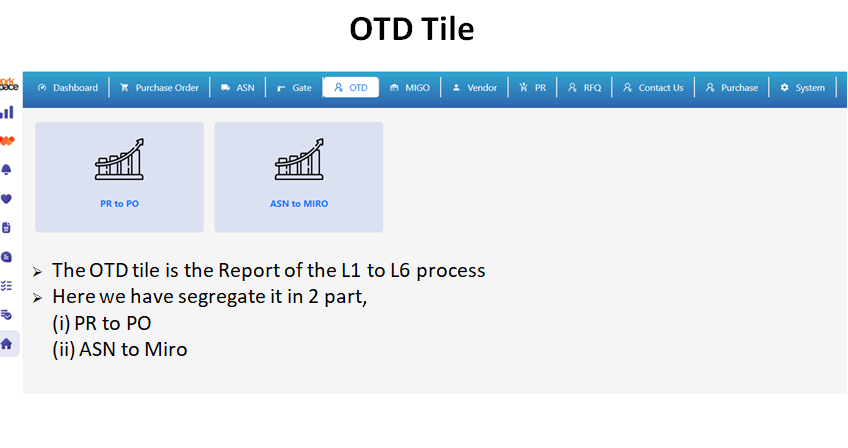
Phase 1: PR to PO Creation
PR has been Created through SAP.
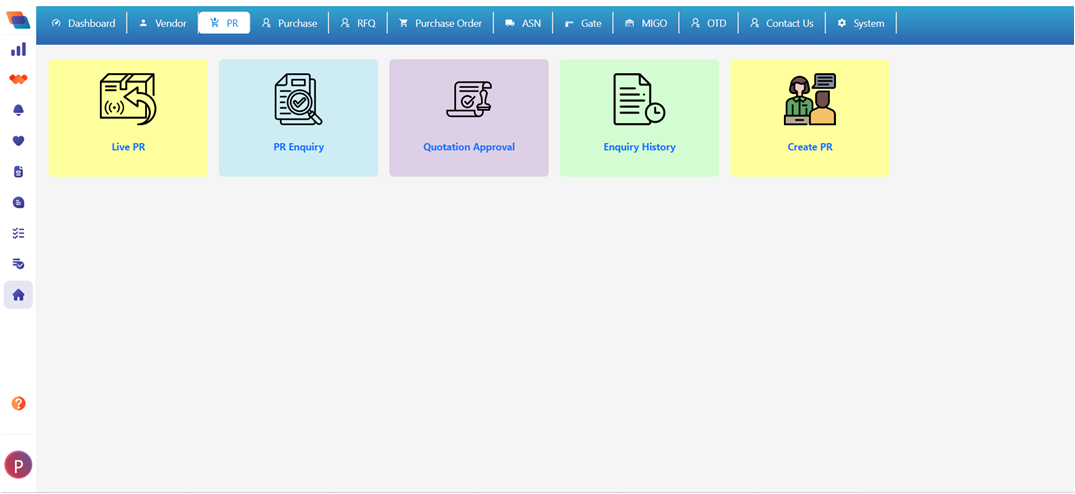
PR shows in the PR tile
- Live PR
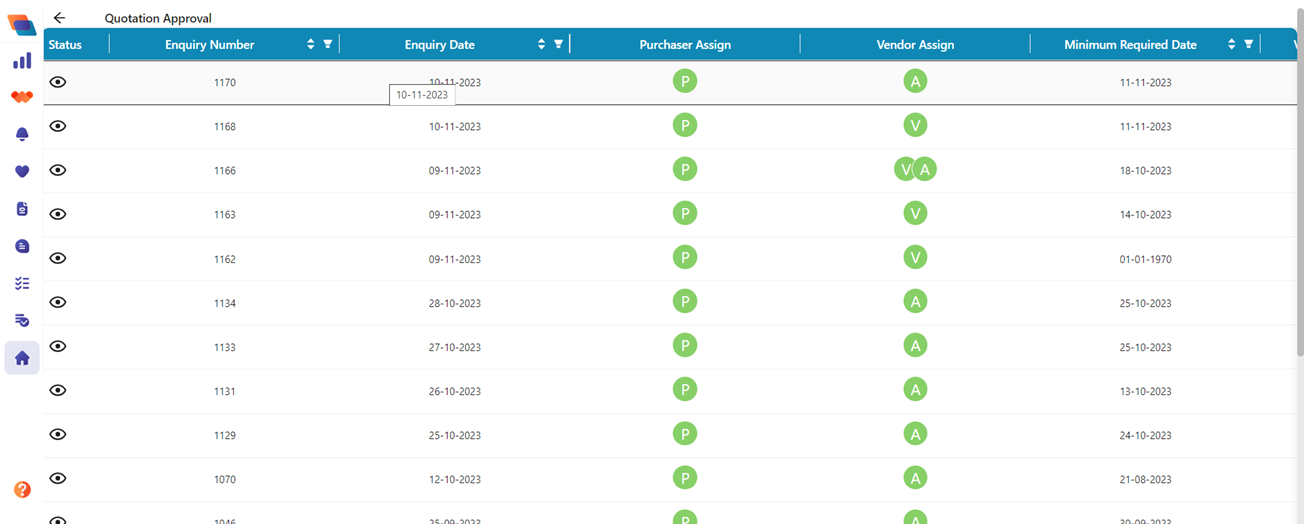
- PR Enquiry
- Quotation Approval
- Enquiry History
- Create PR
Go to Live PR
Select the line Item and click on Generate Enquiry No.
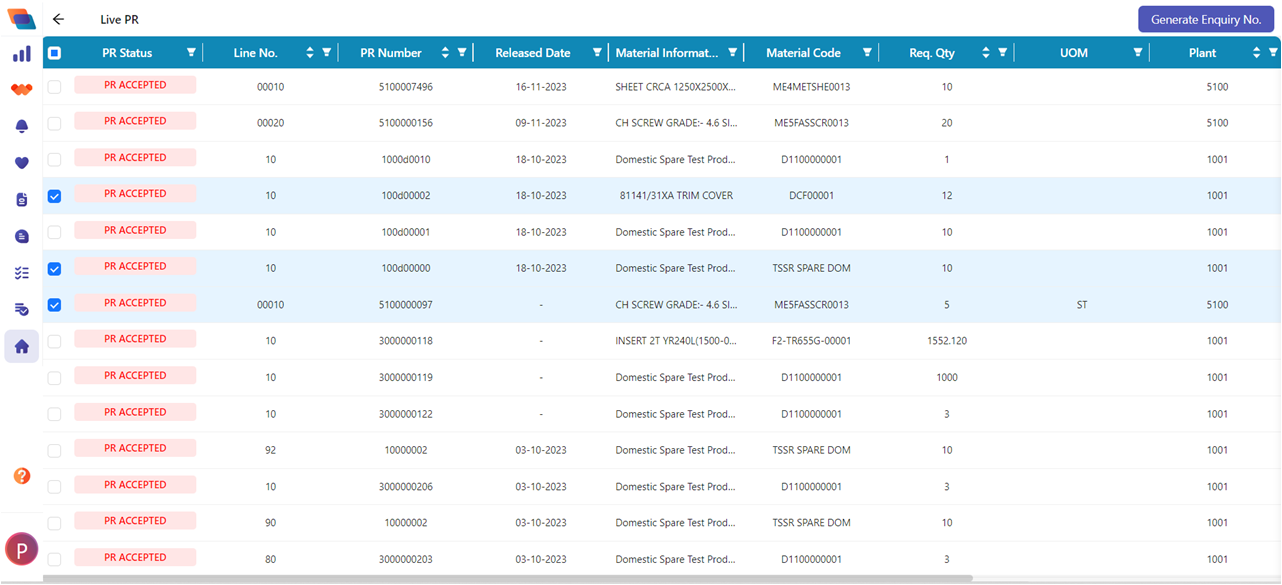
Admin can choose multiple PR for creating Enquiry.
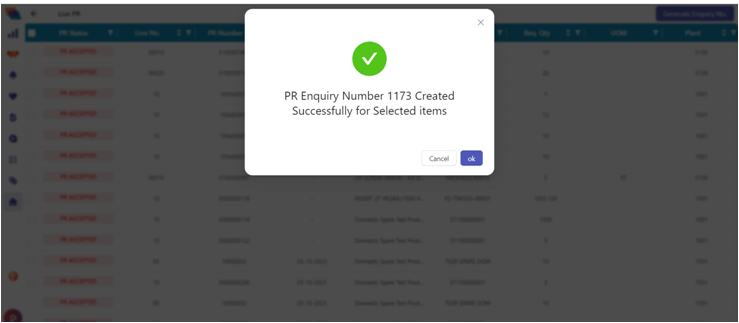
- Admin create the Enquiry number
- Go to the PR enquiry tile
- Here admin can see the new inquiry.
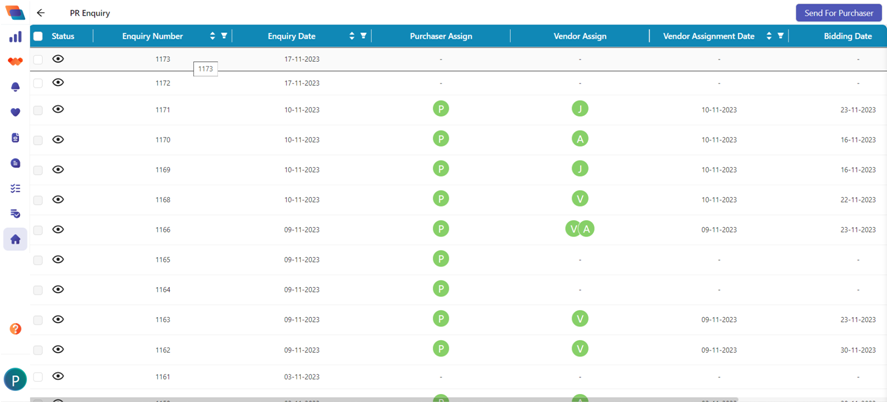
- Double-click on the enquiry number.
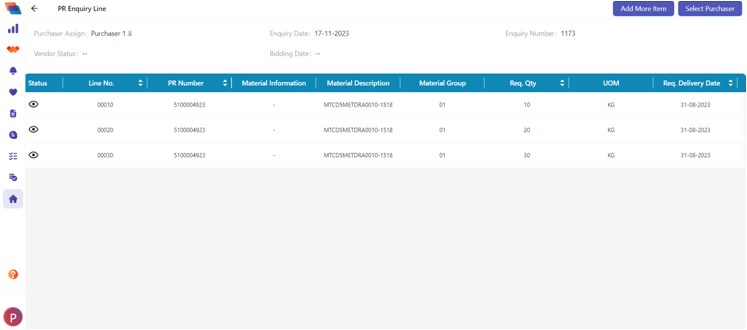
- Here admin can see the details with respect to the inquiry number.
- If required, admin can add more items.
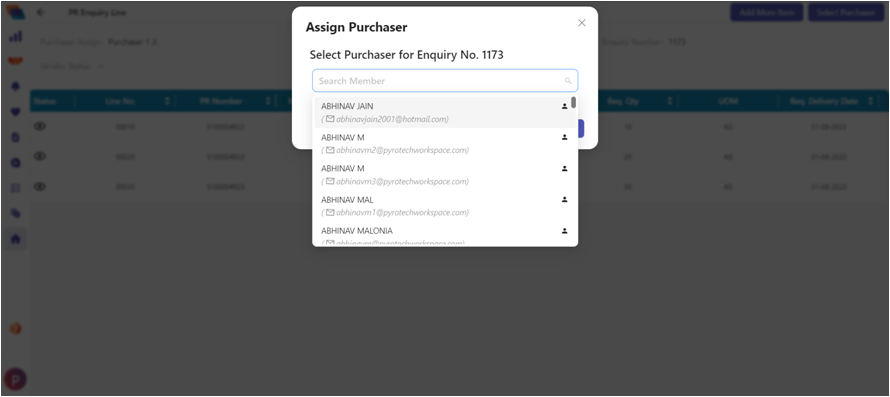
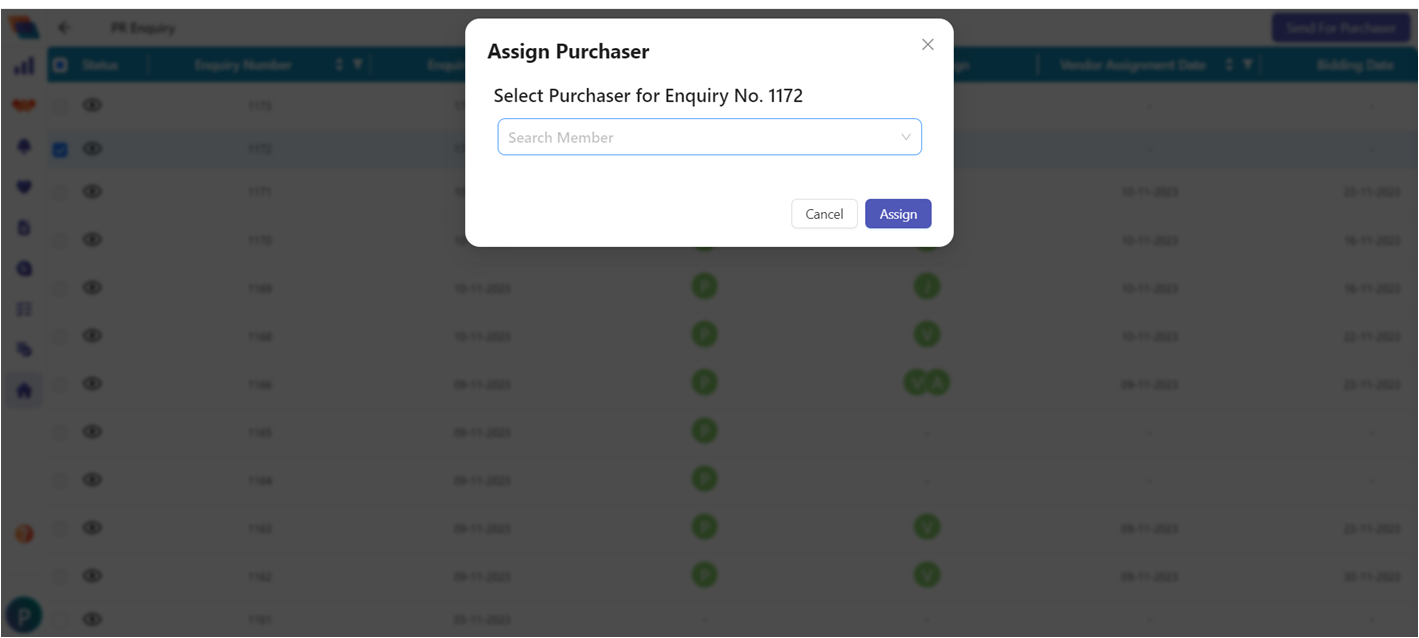
- Then select the Purchaser for the inquiry.
- Click on the Select Purchaser
- Choose a purchaser for the enquiry and assign
Or an admin can direct assign the Purchaser for the enquiry.
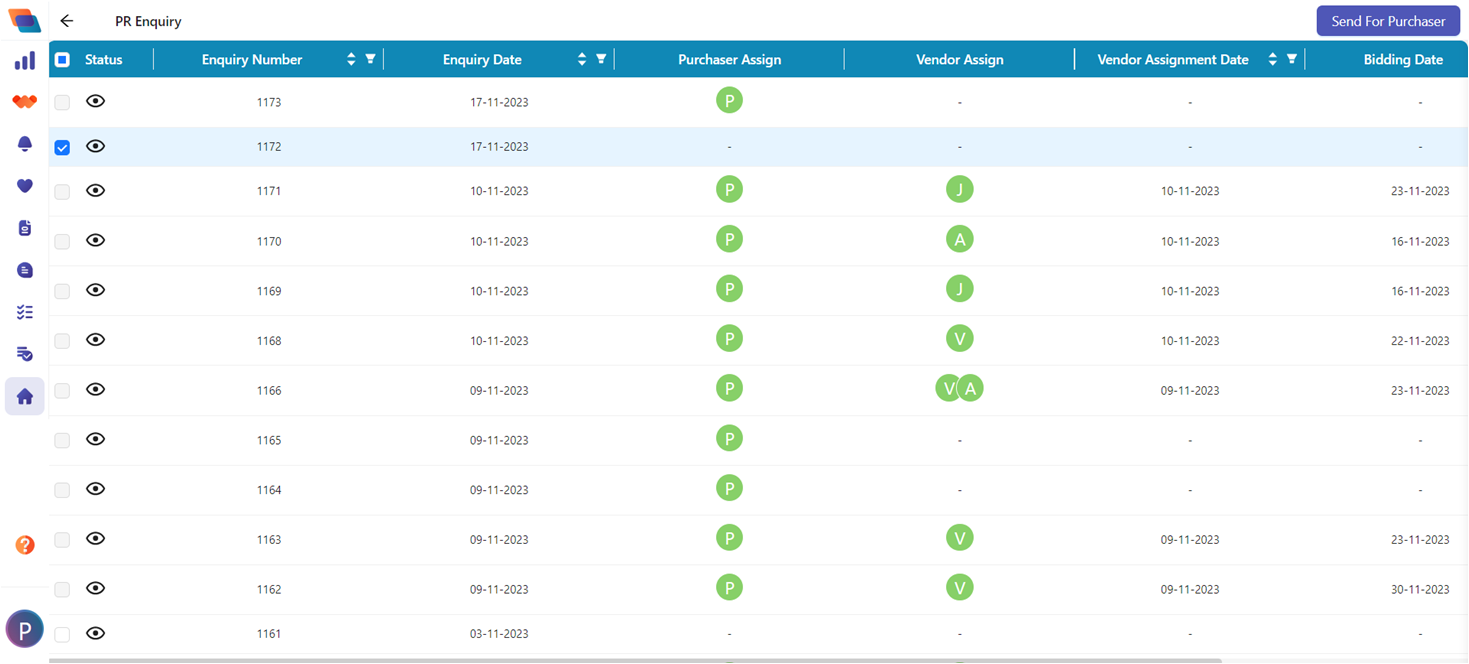
Choose Purchaser
- In purchaser Account
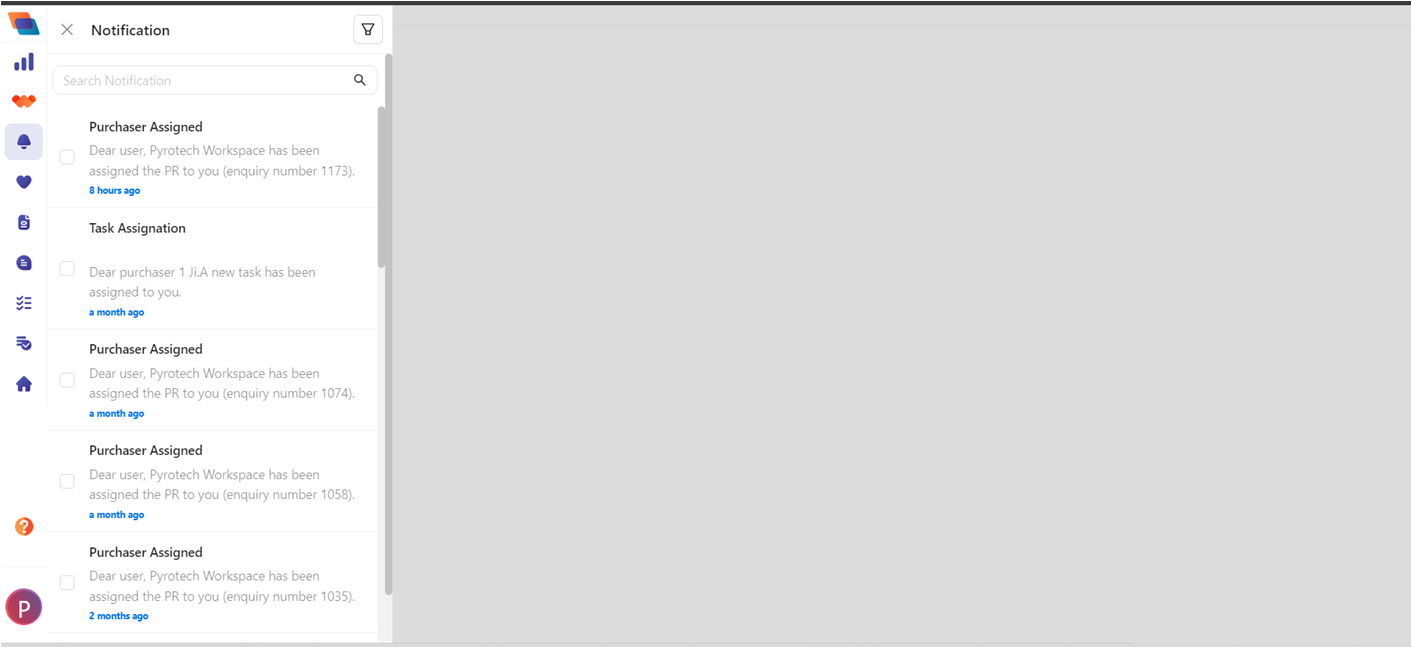
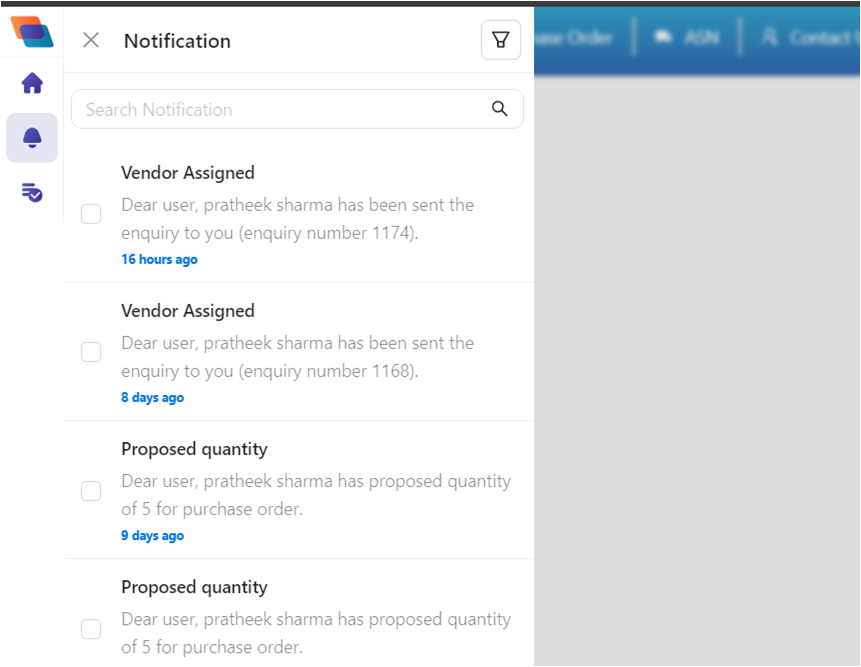
- A Notification has been sent to the assign Purchaser
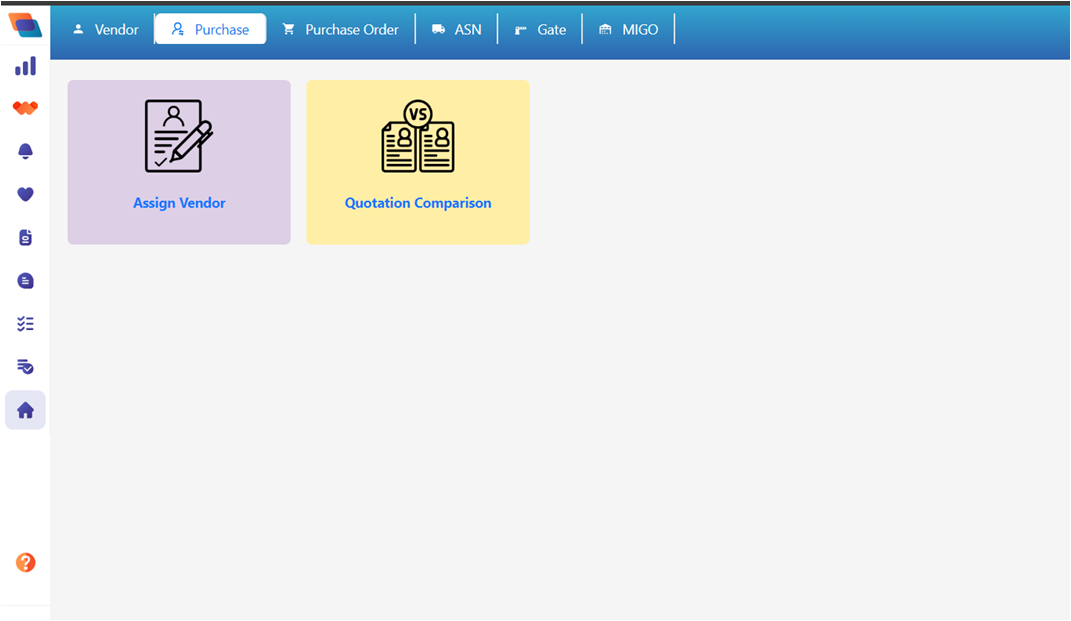
- The Assign Purchaser go to the My Portal
- Choose Purchase tile
- Then select Assign Vendor
- Select the Enquiry number on which purchaser want to assign Vendor
- Double click on the Enquiry Number line item
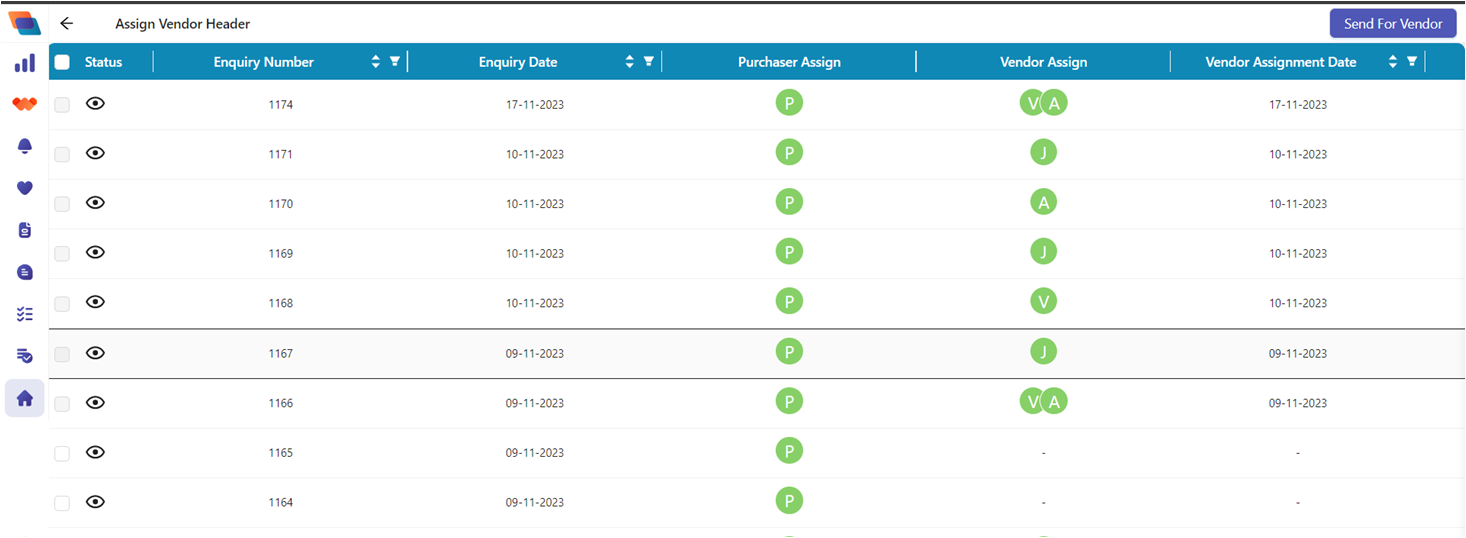
- Select the Bid End Time and Select Vendor
- Send for Vendor
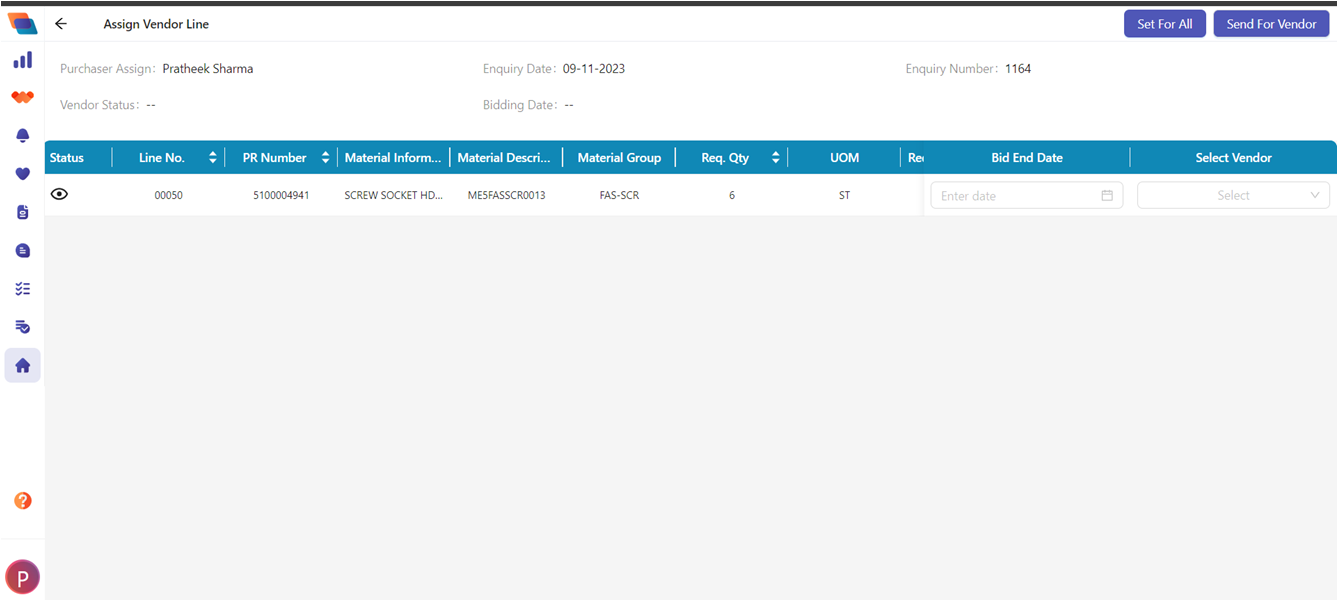
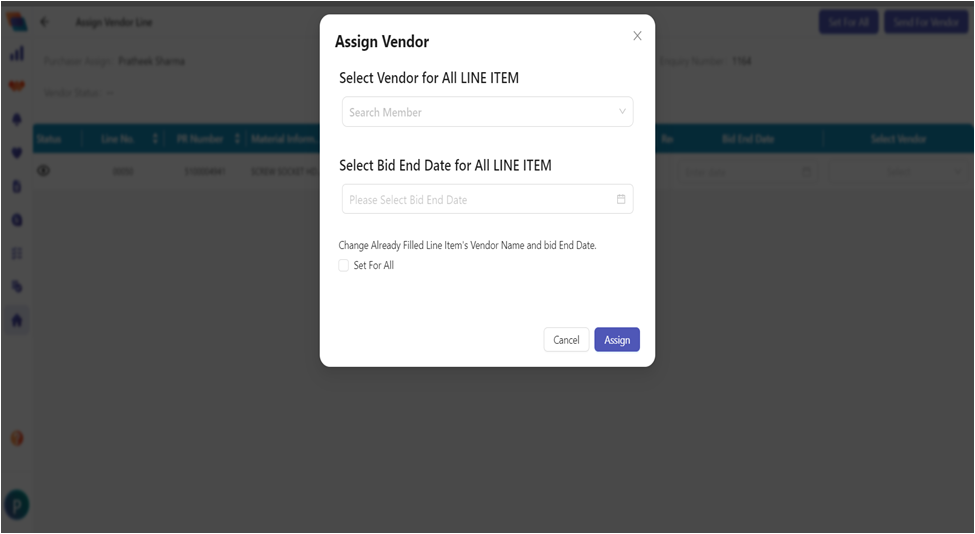
Set For All
- Set for All, this button for set vendor and date on all the line items.
- Here you can assign multiple vendor on a line Item
- Once the Purchaser assign vendor click on Send For Vendor
Vendor Account
- Vendor received a notification w.r.t. the enquiry number.
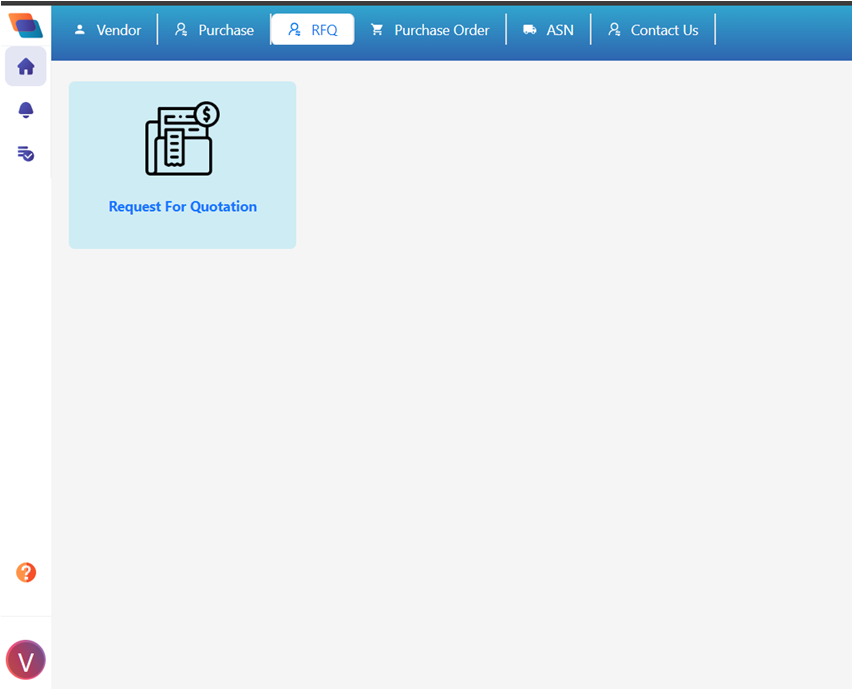
- Then vendor go to My Portal
- Select RFQ Tile
- Select Request for Quotation
- The Enquiry list seen in the RFQ Header
- Initially the Enquiry Status shows “Pending.”
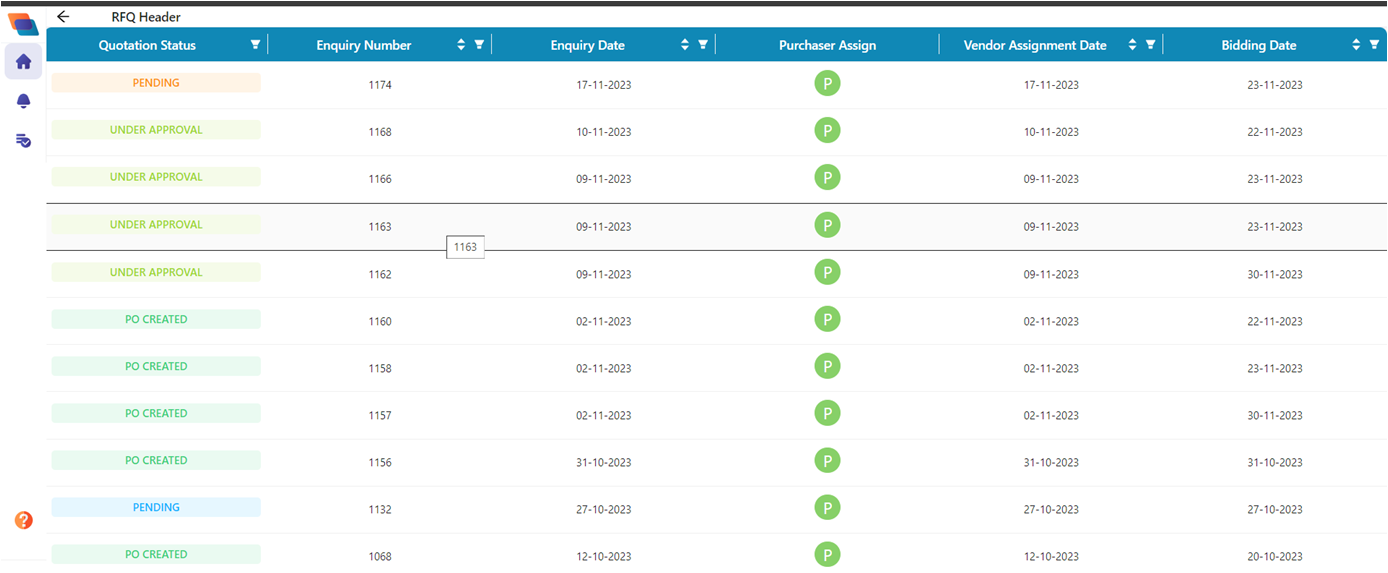
- Double Click on the “Pending” Enquiry.
- Request For Quotation Items, Click on Arrow in front of line Items for Fill the Quotation.
- Here Vendor have two option to fill the Quotation (i) Header Level (ii) Item Level.
- Header Level- To fill same quotation for all line Item, if the price, date and other entities are common.
- Item Level- To fill different quotations for different line item.
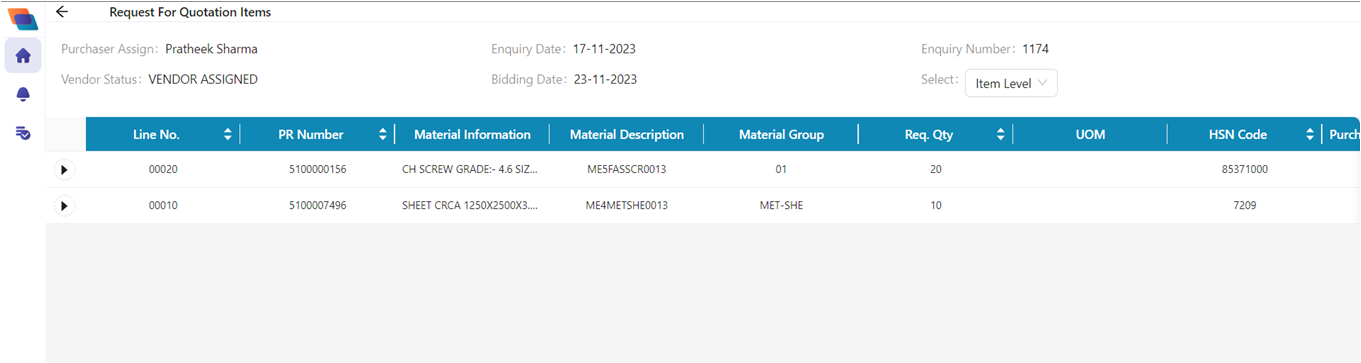
- Request For Quotation Items, Click on Arrow in front of line Items for Fill the Quotation.
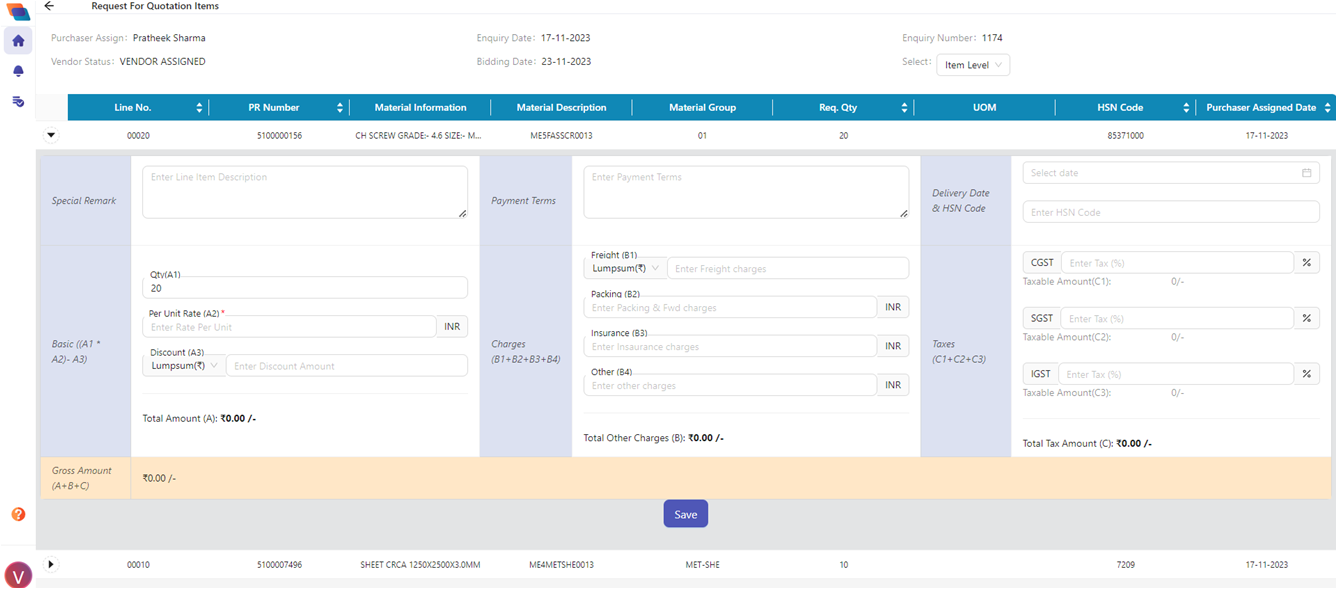
- Vendor Have to Fill all the Details, And Click on the Save
- Then the request send to the Purchaser and the Quotation Status update from “Pending” to “Under Approval”
Purchaser Account
- The Purchaser has received a notification from Vendor side
- Go to the Purchase Tile
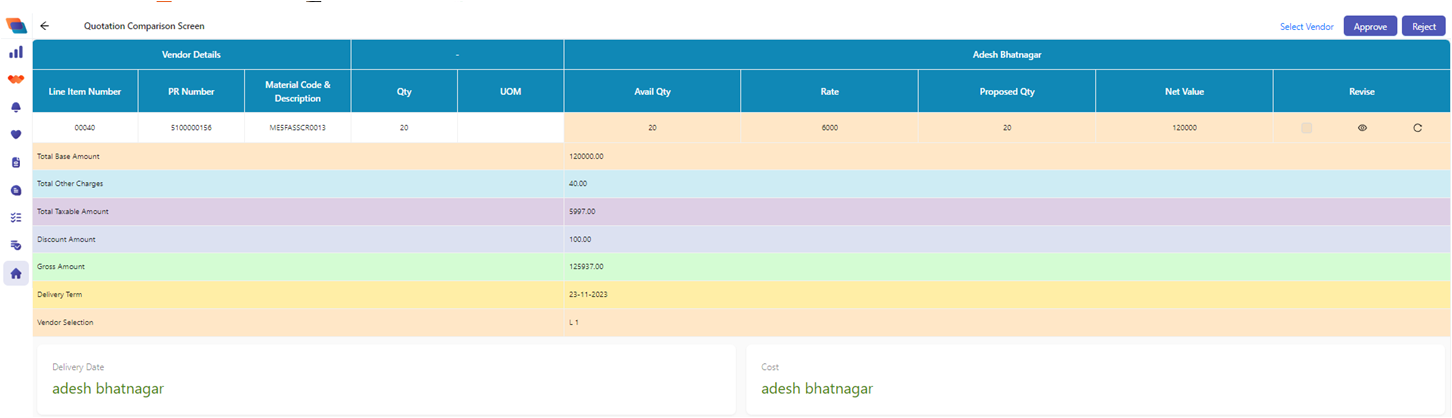
- Select Quotation Comparison
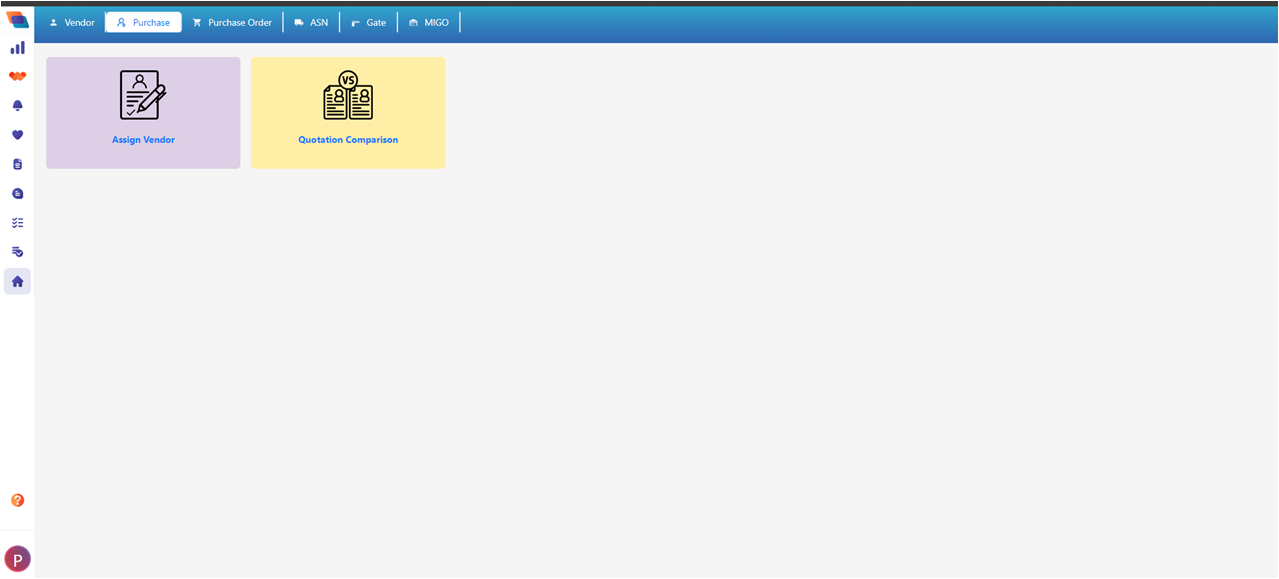
- Double Click on the Enquiry Number line item
- To see the quotation send by Vendor
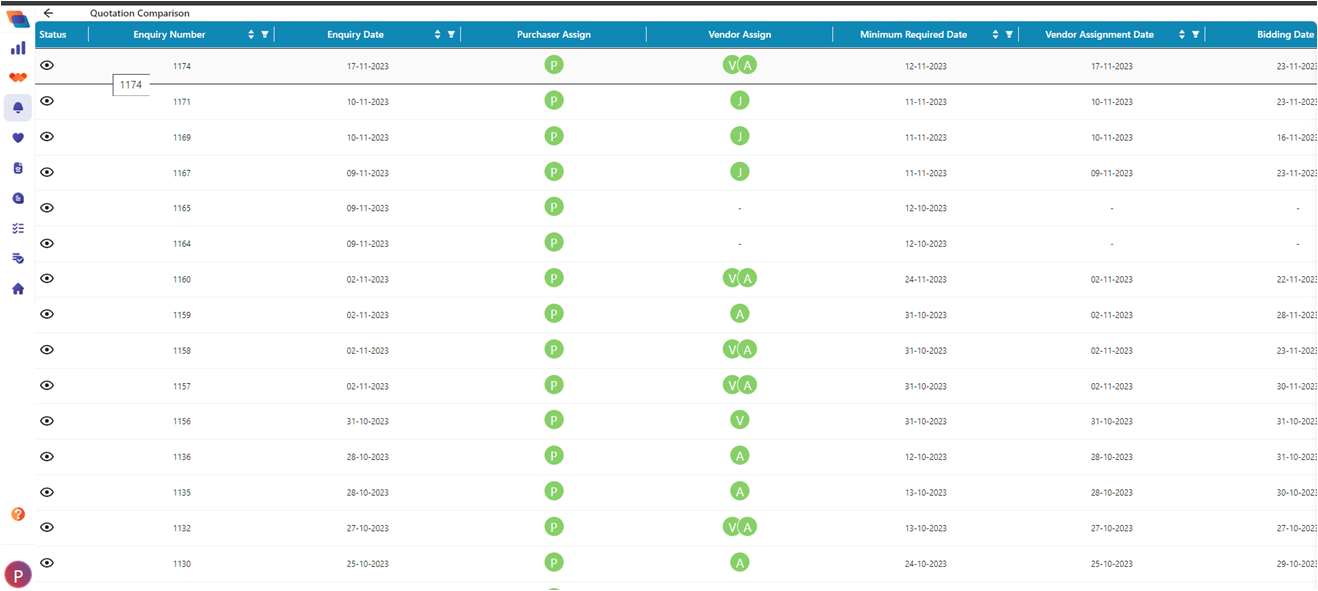
- Here the Purchaser can the detail quotation
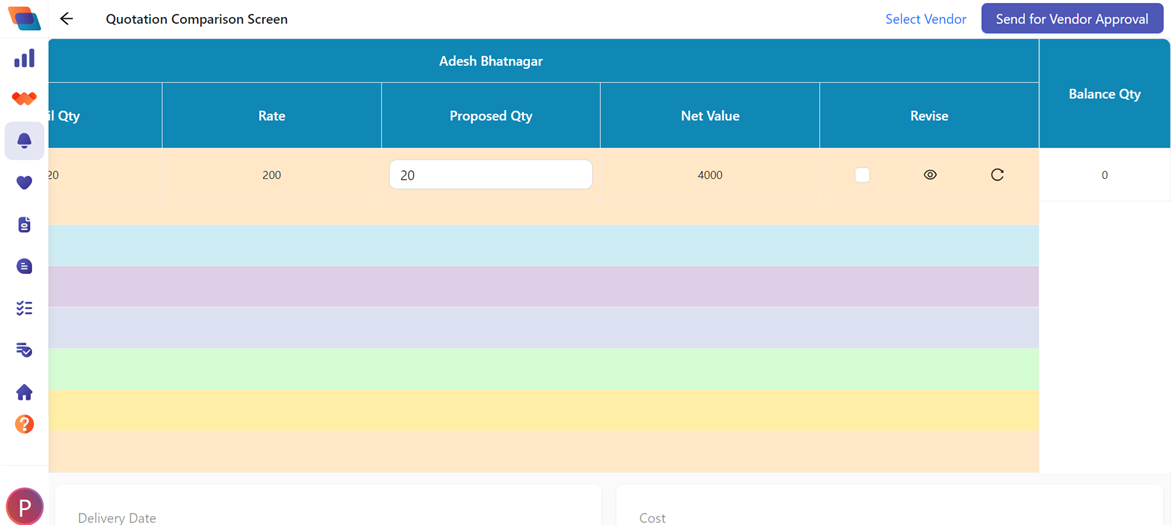
- Purchaser need to fill purposed quantity.
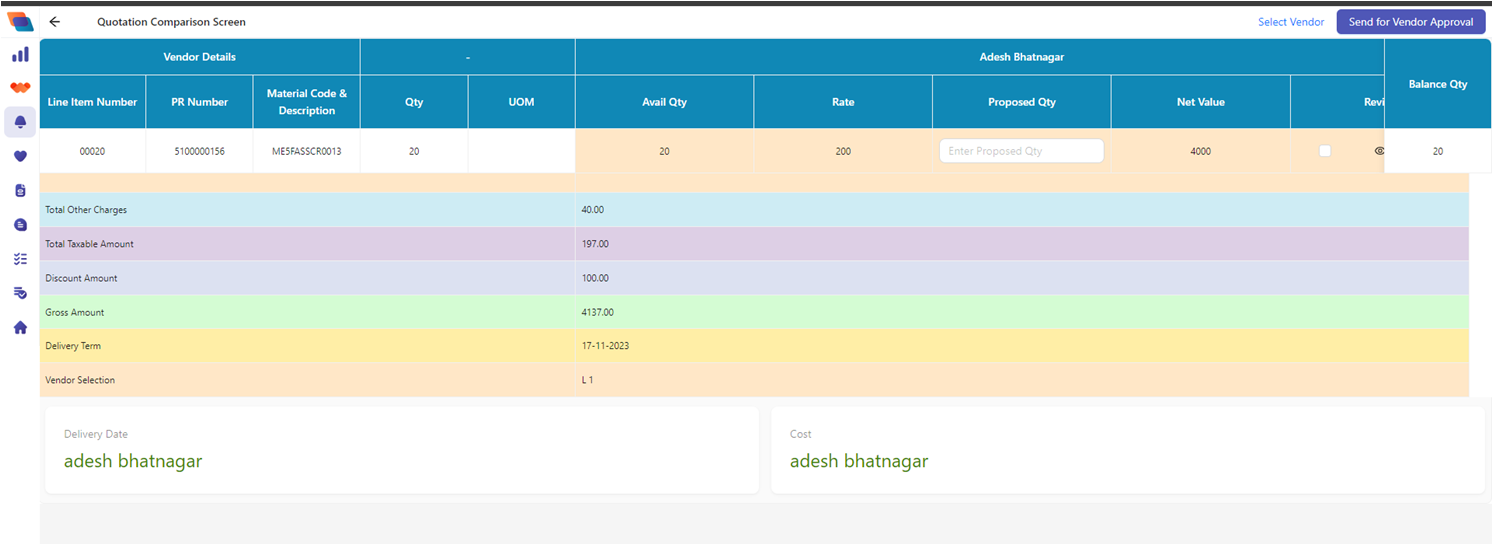
- Revise: Click on the check box for Reject Vendor, if purchaser reject the vendor then the material will be deleted.
- The Eye Button- To see how many times it revised
- The Refresh Button- To Send For Negotiation to vendor
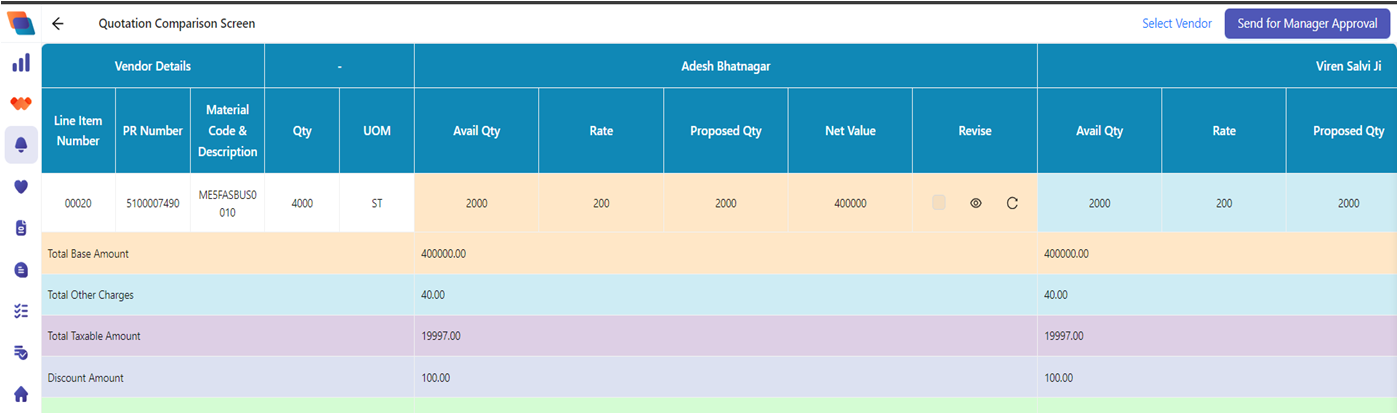
- Select Vendor- When there are multiple vendor assigned for a enquiry then the Purchaser has the rights to choose vendors by this option.
- Until the balance Qty not equal to zero till then the purchaser not Send for Vendor Approval
- Once the Balance Qty is Zero then Click on the Send for Vendor Approval

- Once the purchaser Send For Vendor Approval, go back to the Quotation Comparison page.
- Then again double click on the Enquiry Number
- A no editable page appear and click on the Send for Manager Approval
- The Workflow request send to the admin for vendor approval
Admin Account
Double click on the Enquiry Number, which requested for Quotation Approval from Purchaser
- Admin can review the Quotation send by Vendor and approved by Purchaser.
- Also Admin can Revise same as Purchaser can do.
- Admin can Approve and reject the Quotation.
- Once the quotation approved then the PO creation has been created Successfully, all the approval and rejection history stored in Enquiry History Tile
- Go to PR tile and Select Enquiry History
- Here all the enquiries having History with approval and rejection status.
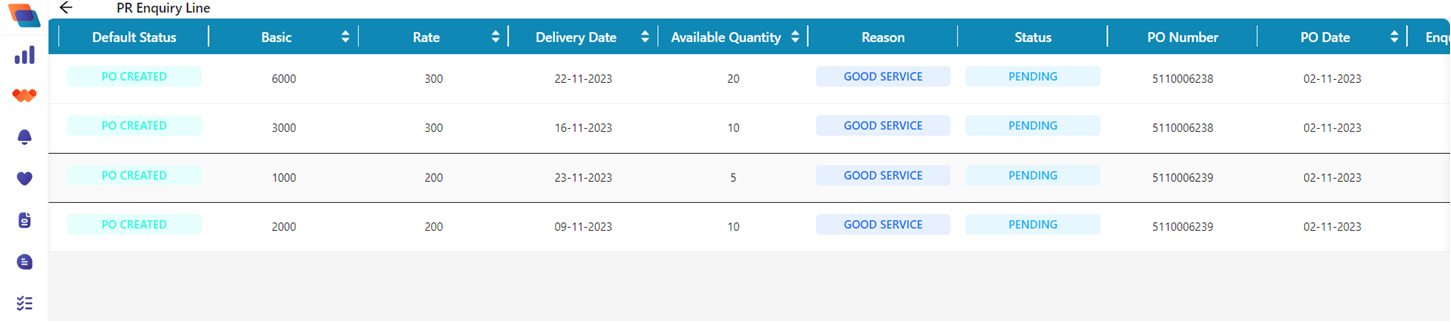
- If admin double click on the enquiry number then all details w.r.t. the line Item has been shown with it’s PO number which have been generated by SAP
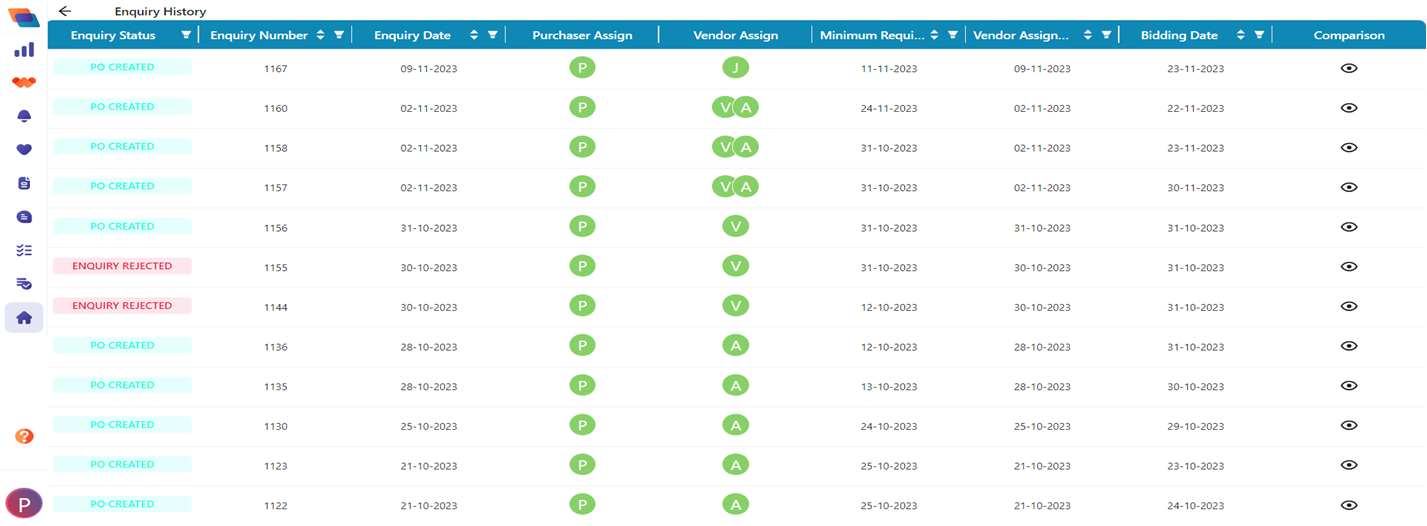
- Double click on the enquiry number then all details w.r.t. the line Item has been shown with it’s PO number which have been generated by SAP
1st Phase PR to PO has been Completed
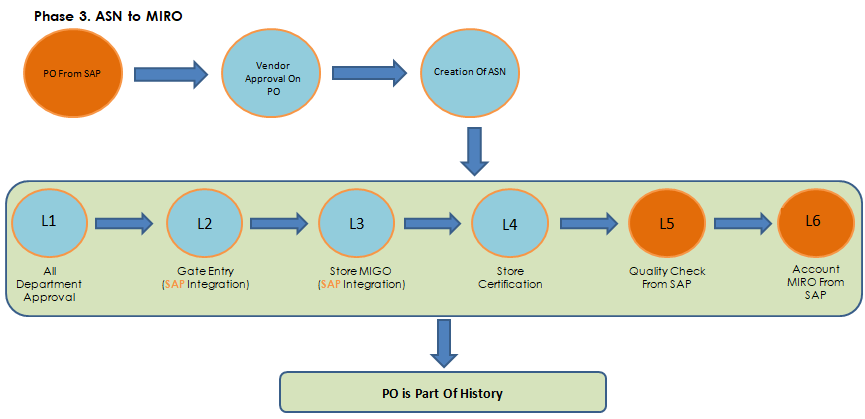
2nd Phase PO to MIRO
- The PO has been created form SAP and the status we have seen in the PR tile -> Enquiry History
- In this phase we are move for the further process which end with MIRO.
- PO will released by the SAP, against the Vendor.
- Initially the PO has been shown in the Vendor’s Notification and received a Workflow for approval.
Vendor Account
- The Vendor received a Notification with workflow for Approve and reject the PO.
- In the Notification all the details has been share with PO number
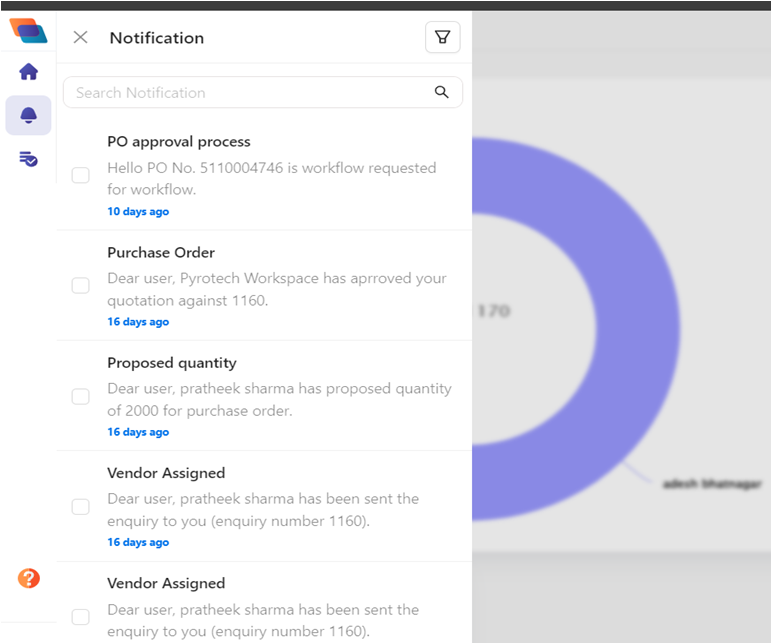
- Go to Workflow tab in the Menu and Vendor can see the all workflow in the list, Click on a workflow.
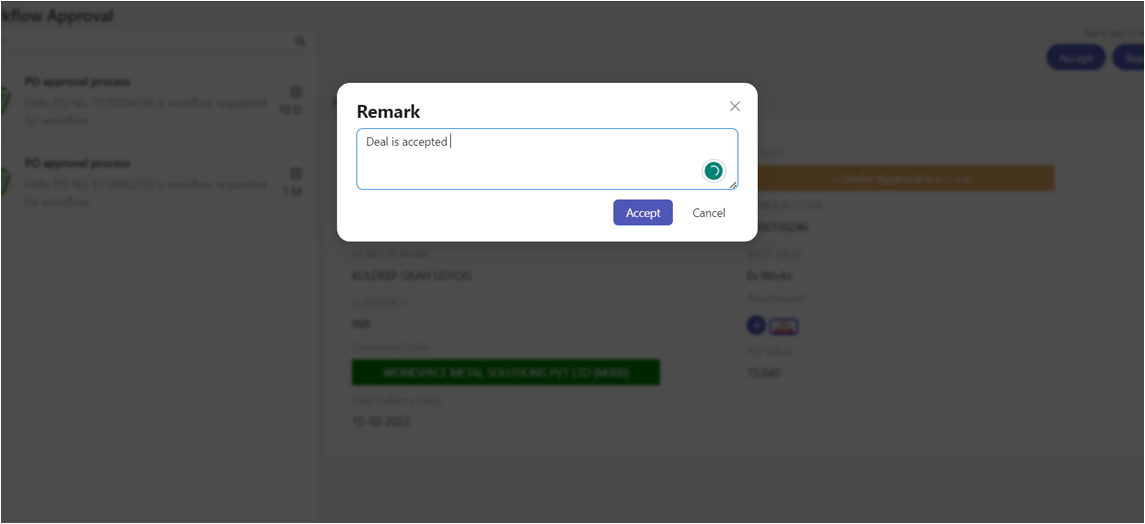
- Check all the details and then vendor Accept or Reject the workflow
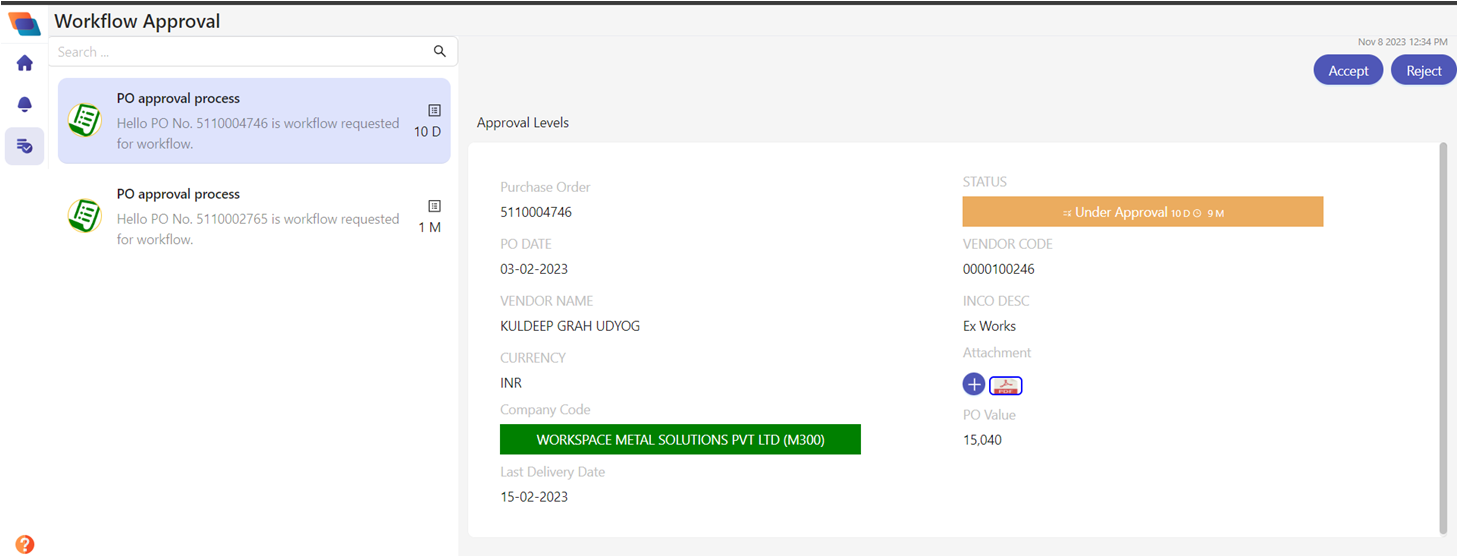
- If Vendor Approve the Workflow it send to the Purchase order tile -> Live PO in the same account
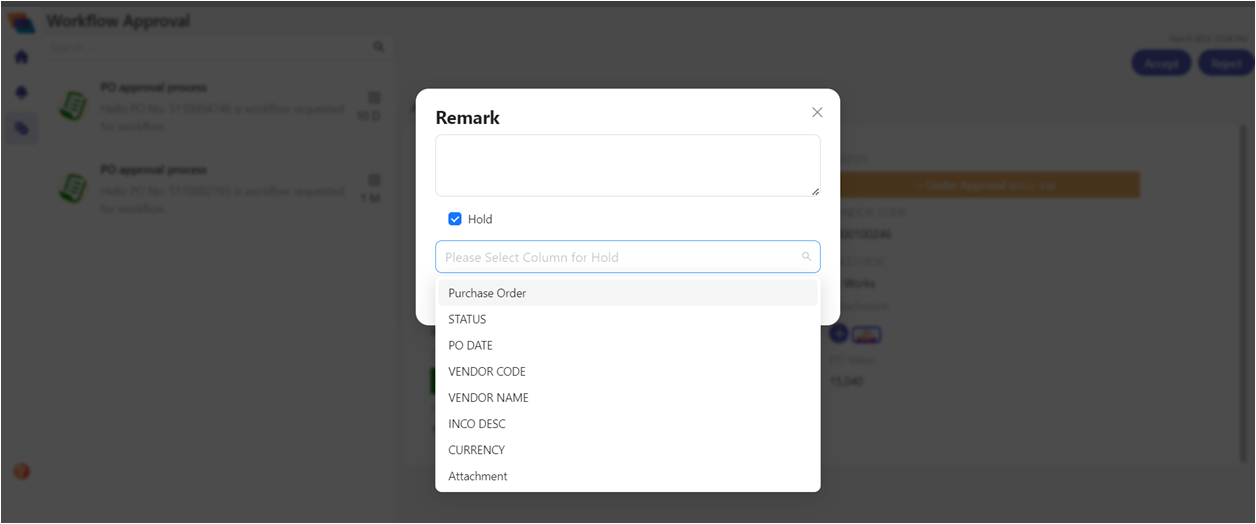
- If Vendor not agreed with the deal and having objection on any field the vendor Hold the workflow and choose the column /field which need to be changed, and click on Hold.
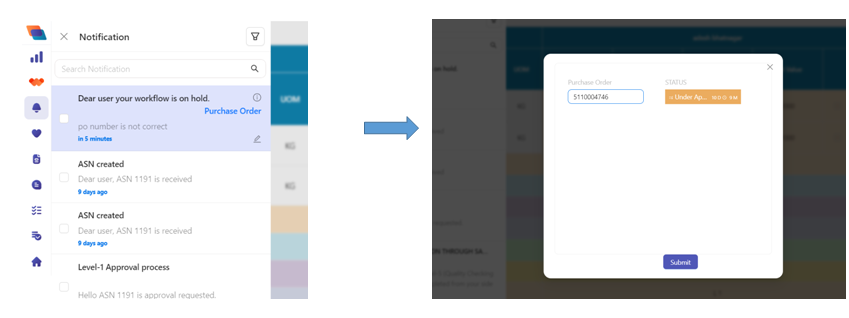
- This request send to the Admin account
- Admin Received a notification from vendor.
- The Admin can Edit and make the amendment on the given field
- After make changes click on the Submit Button and the request again send to the vendor.
- Once the changes has been made through the admin the Vendor again get the notification.
- Vendor again check the details and make it approved , set remark for that and click on the Accept button.
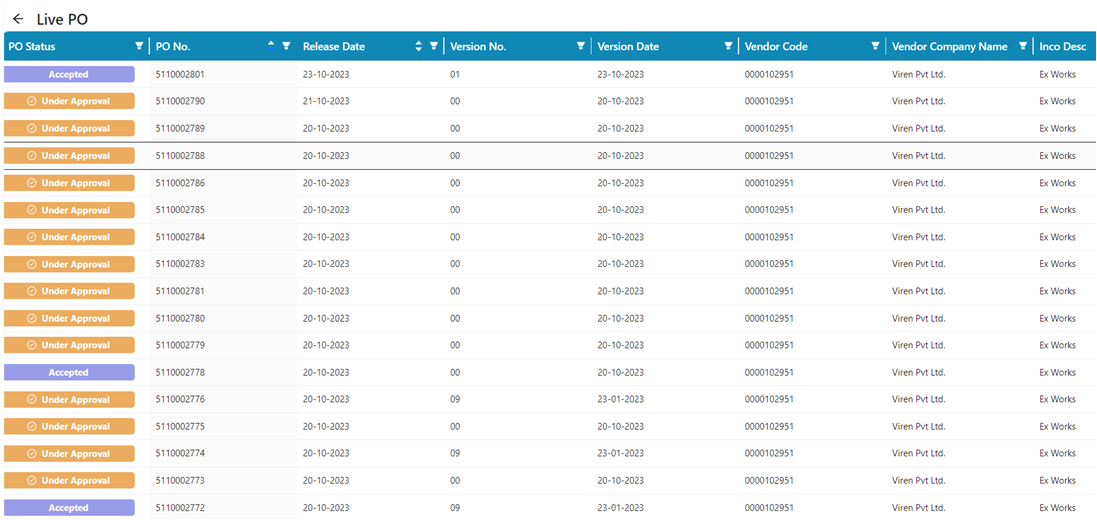
- Then the PO line item move to Purchase Order -> Live PO tile in his account
- Once the PO has been approved the Live PO shows all the Under approval and Accepted PO.
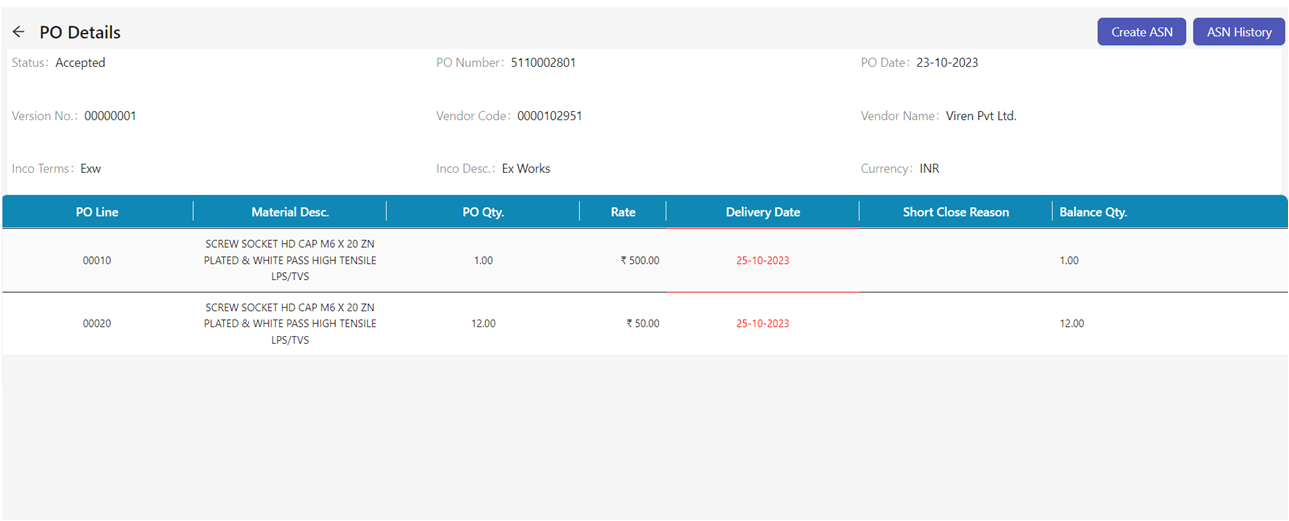
- Double Click on the Accepted PO
- Then the Entire PO details will Show
- Vendor Check all PO details
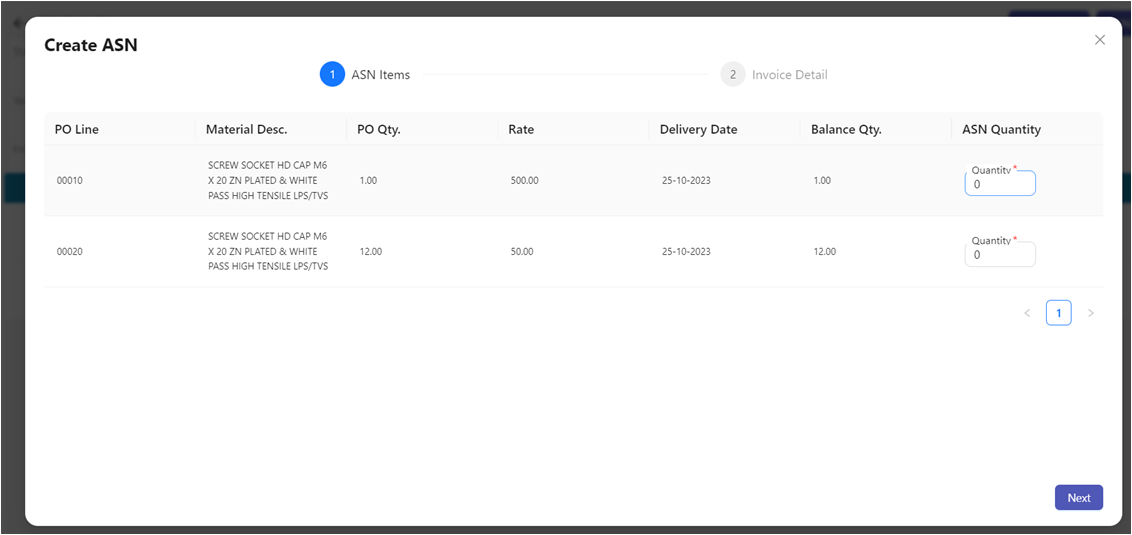
- Click on the Create ASN button
- Create ASN, Fill ASN quantity against the Balance Quantity.
- If the Balance Quantity is zero it cannot allow to fill ASN quantity
- After fill the ASN Quantity Click on the Next
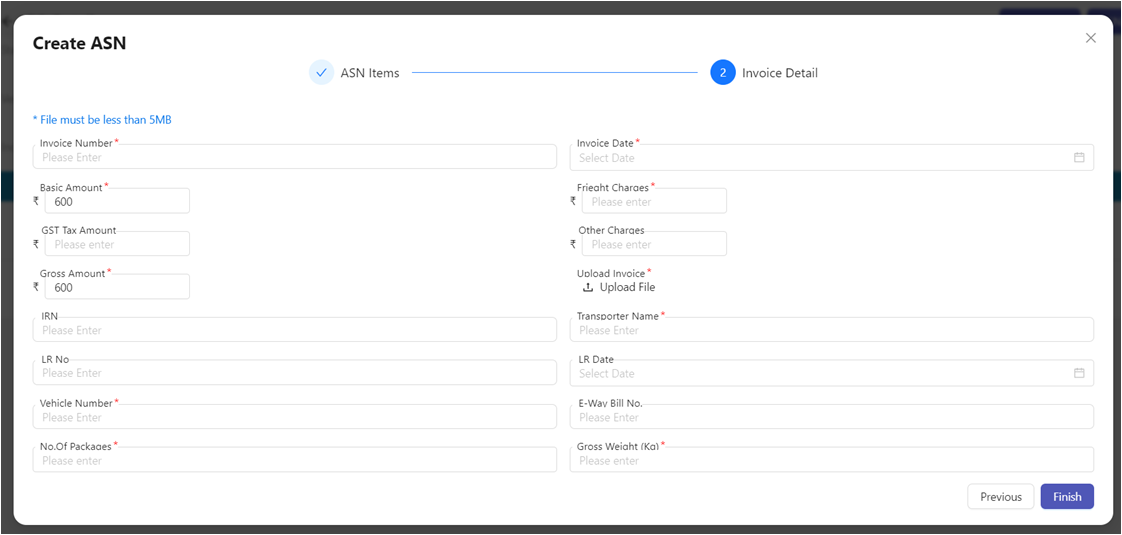
- After Click on the Next, the Create ASN form appeared.
- Vendor needs to fill the form and all mandatory field.
- Click on the Finish Button, and It show ASN created Successfully message.
- After creating the ASN, it replicate to Live ASN tile with Under approval ASN status.
- At the same time a workflow has been triggered and send for 3 level approval to the
(i) Purchaser,
(ii) Store and
(iii) Quality Departments
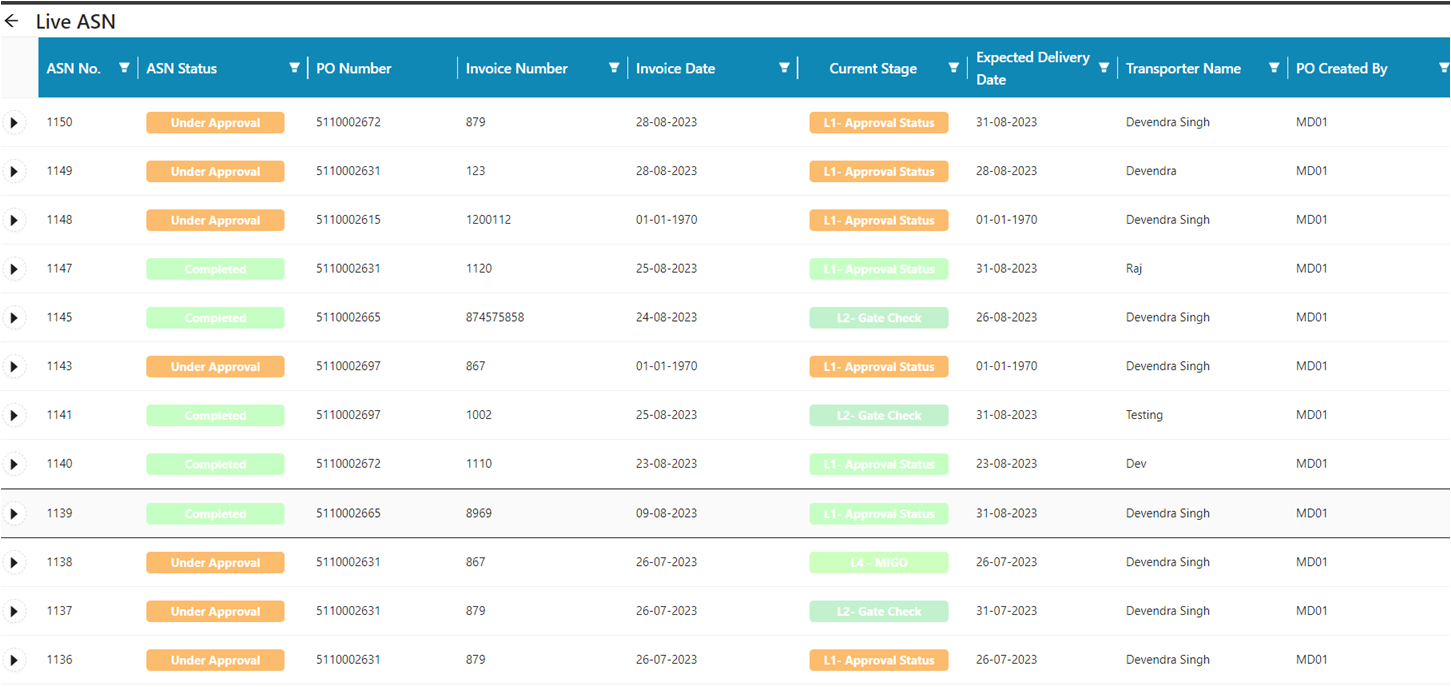
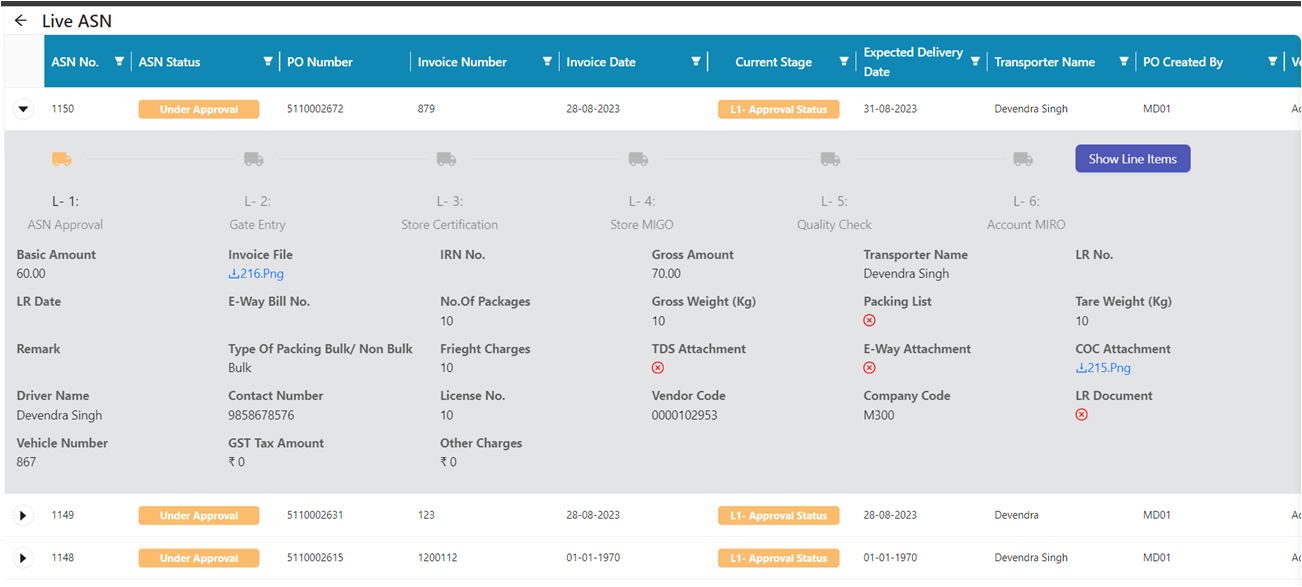
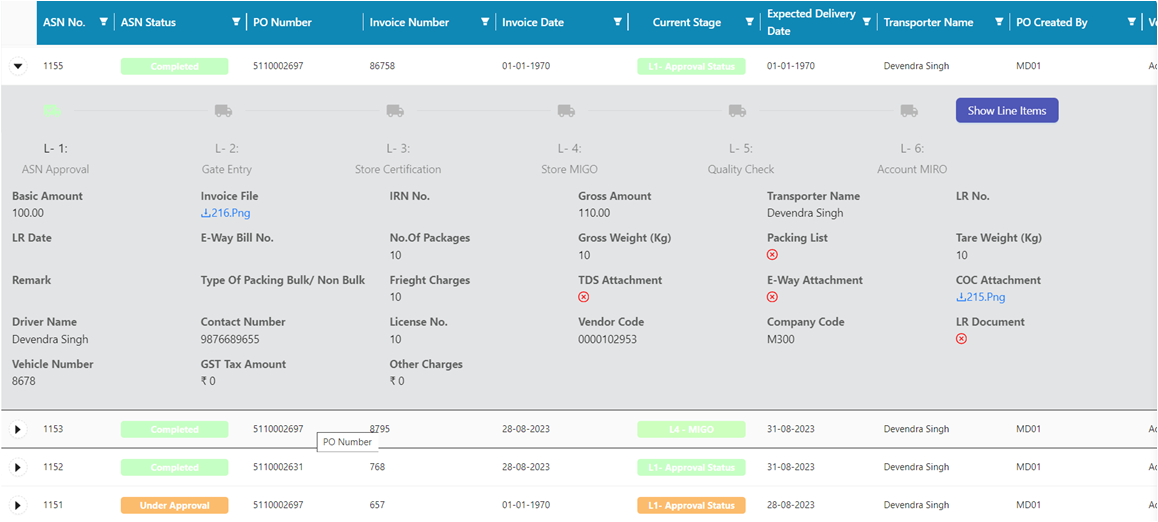
- Click on the arrow button in front of the ASN no.
- Here the vendor can see all the progress form L1 to L6 with all details
Purchase Account
- For Workflow approval, Purchase received a notification and Workflow for approval.
- Purchase check the details and make the decision for Accept and Reject.

Store Account
- Once the workflow has bee approved from Purchase then it received to Store Department
- Store Manager Accept or reject the 2nd level and move it to the Quality department.

Quality Account

Rejection/ Hold Case
- If at the any level the workflow has been rejected then the manager at any level can reject directly or can Hold the workflow.
- Once the Managers hold the workflow at any level it request go to Vendor
- Then vendor make changes and submit it and again it comes to the manager for approval.
- The manager check the details and mark as Approved.
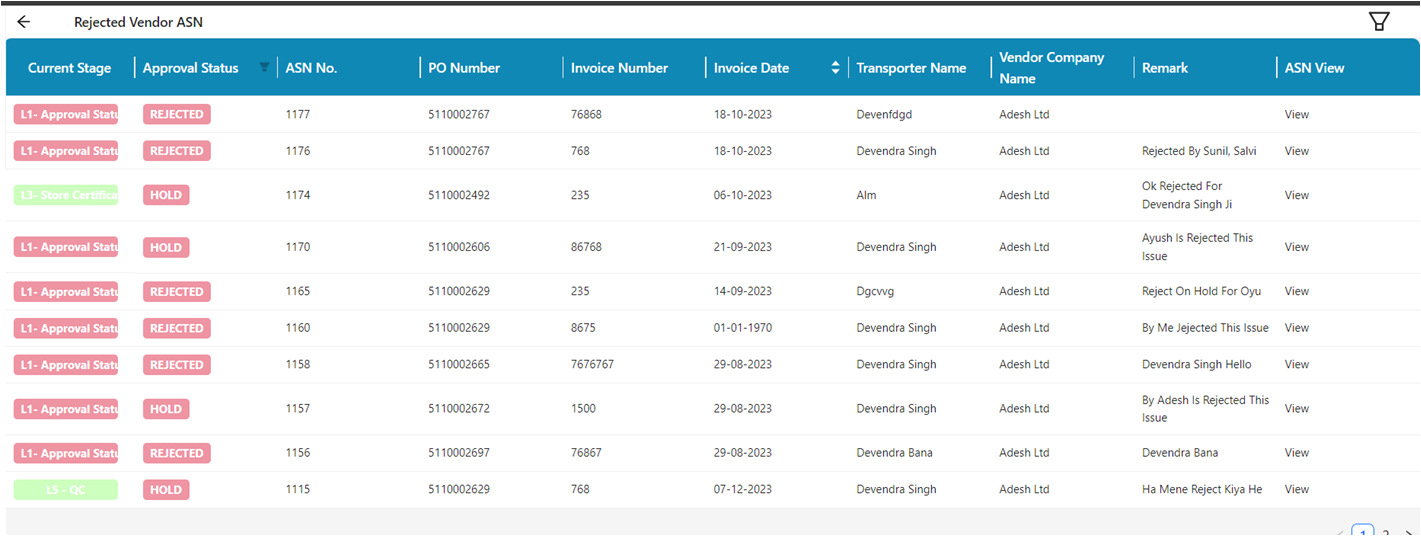
- In the process the the “Hold” status is shown in rejected vendor tile
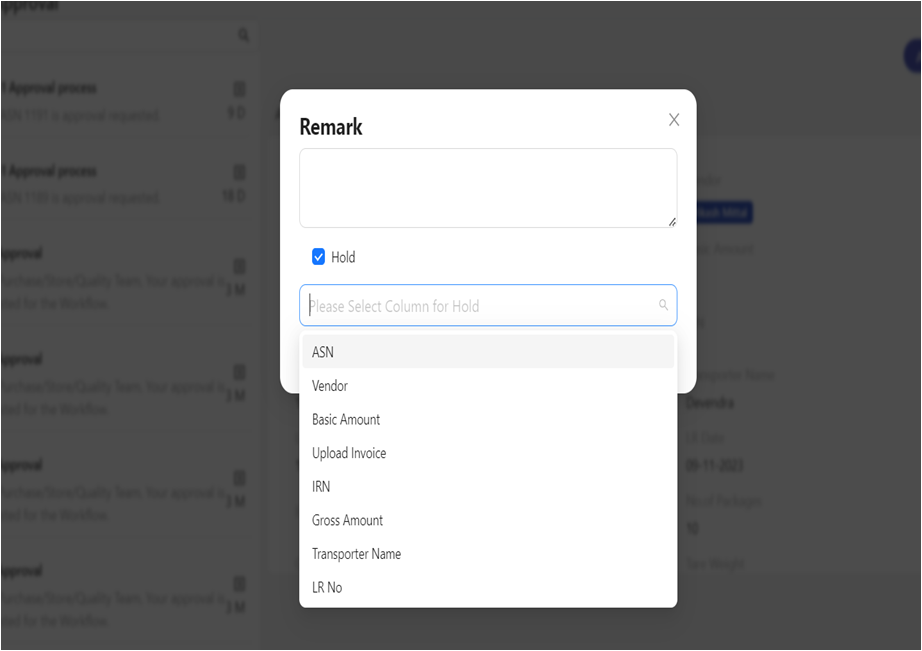
- In the process the “Hold” status is shown in rejected vendor tile.
- When status is Rejected it is non editable, on Hold the vendor click on “view”, the pop up appear and vendor can change the specific field value. Then submit the changes.
- After that the Hold status disappear form the list
Vendor Account
- When the workflow has approved from all the 3 levels, then in the Live ASN tile the ASN status changed from “Under approval” to “Completed”.
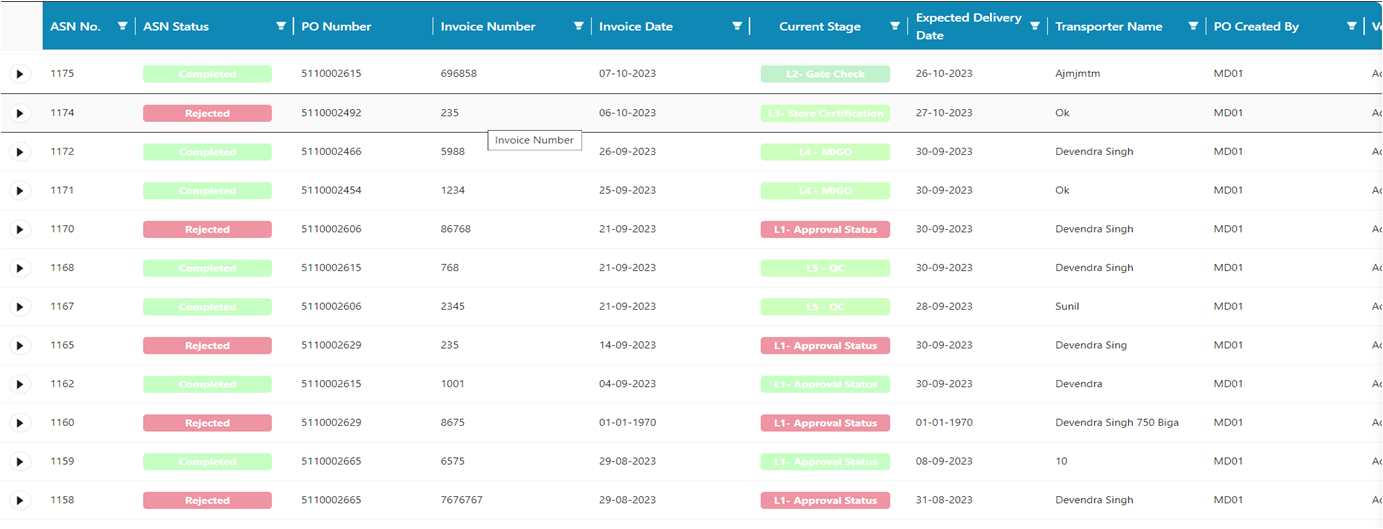
- When the workflow has approved from all the 3 levels, then in the Live ASN tile the ASN status changed from “Under approval” to “Completed”.
- Here the Vendor can see the L-1 status has been completed


Gate Account
- Login by Gate account
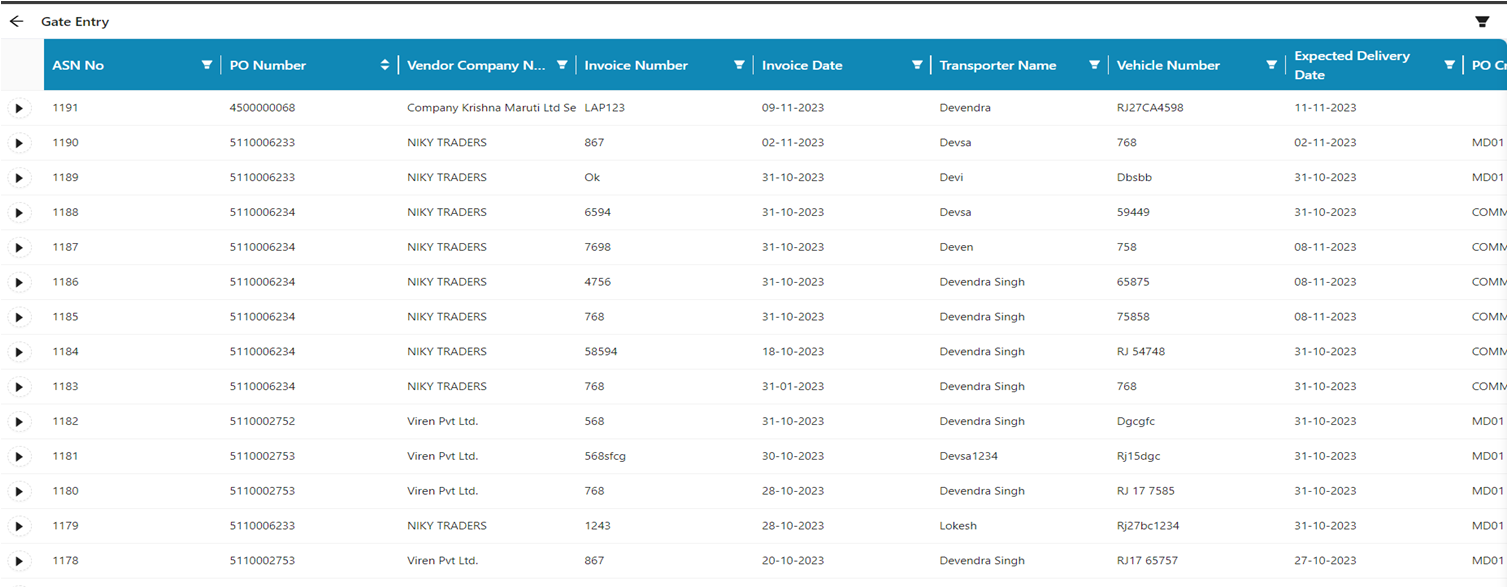
- Go to My Portal, select Gate Tile and choose Gate Entry
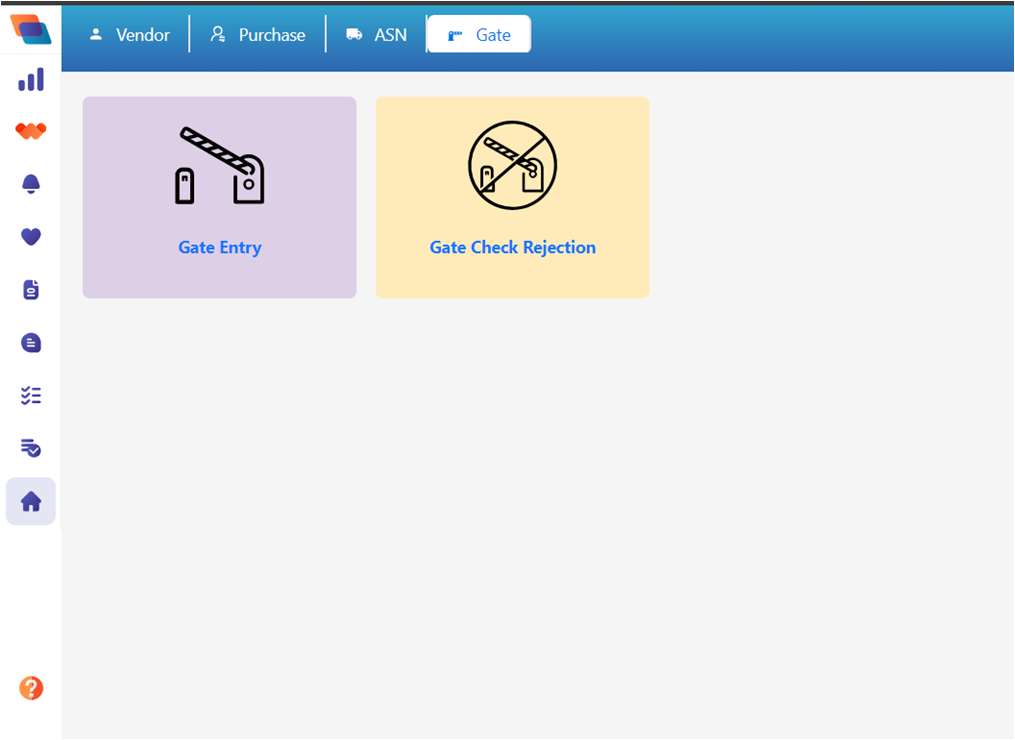
- Click on the Gate Entry tile
- Double click on ASN number, and a gate check pop up appears.
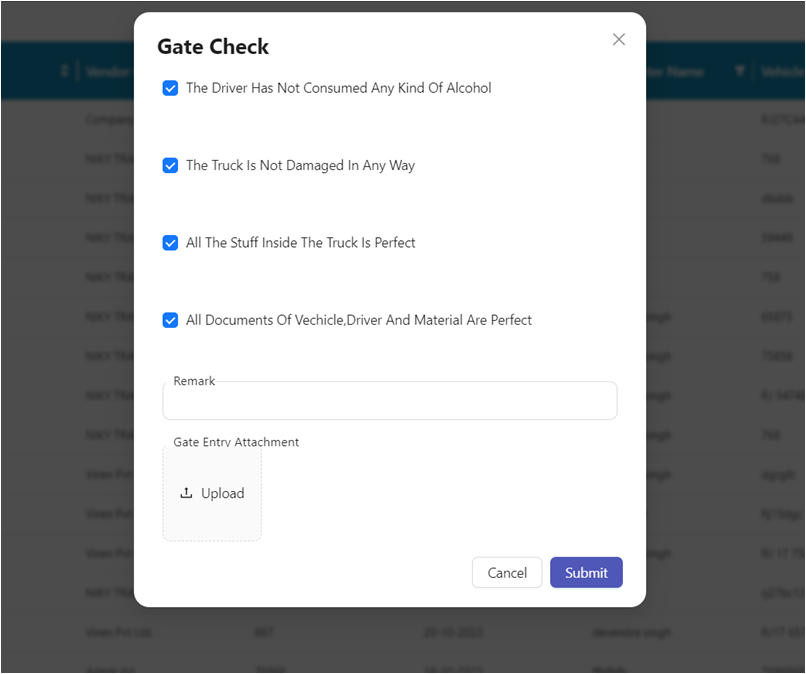
- After submit it move to Gate Control page.
- Gate Authorize person check all the details and click on the “Gate Entry Done” Button.
- A gate entry number has been generated.

- To check the gate entry number.
- Gate Entry, click on the arrow in front of ASN number and Click on the L-2 truck Icon.
- After Gate Entry the Store manager received a notification, for next approval/ process.
Store Management Account
- After Gate Entry completion, store manager get a Notification for the further process.
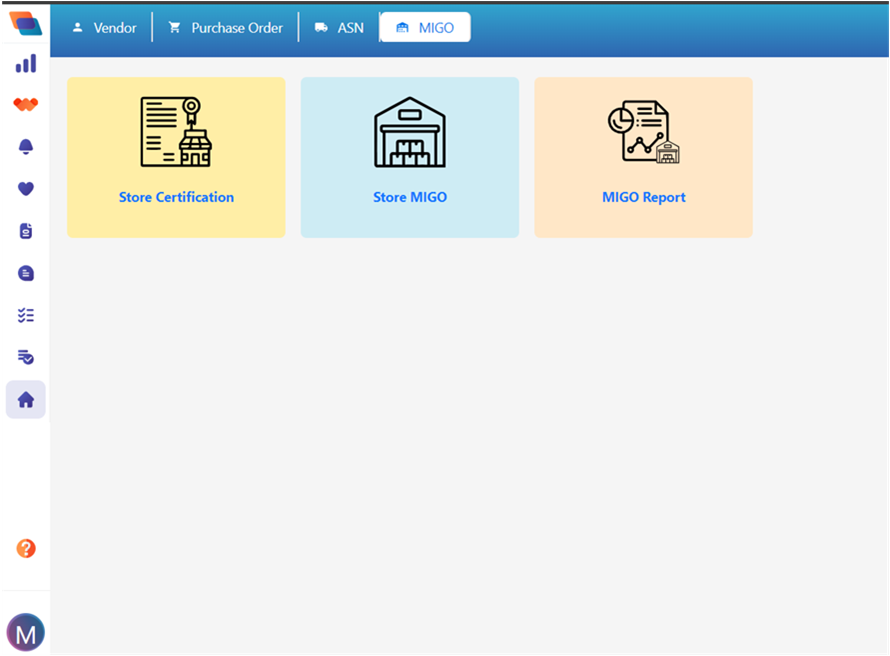
- Go to MIGO and select Store Certification tile.
- Double Click on the ASN No.
- It Drill Down to the Store Certification page .
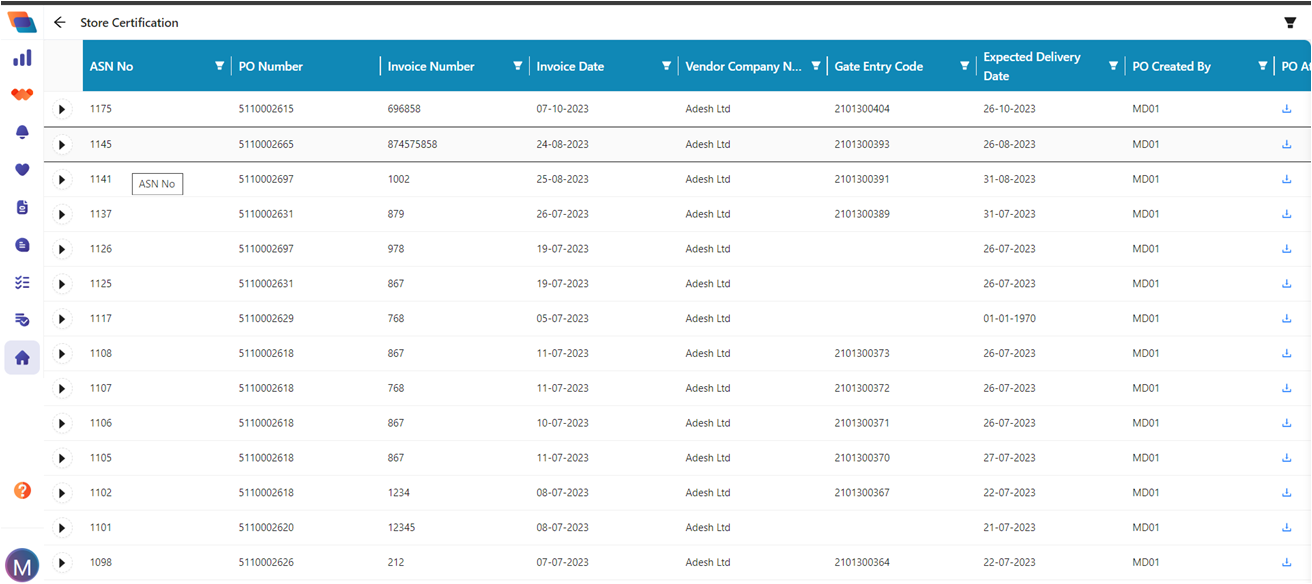
- Double Click on the ASN No.
- It Drill Down to the Store Certification page .

- There are 3 conditions
(i) Approve: All the store quantity are approved, it ASN move to Store MIGO tile.
(ii) Reject: On reject the entire ASN get rejected.
(iii) Hold: If Store Quantity hold then it show in Store Hold Quantity column,
eg. Store quantity is 10 and hold 2 quantity then, in Store Hold Quantity shows 2 and Store Quantity shows 8
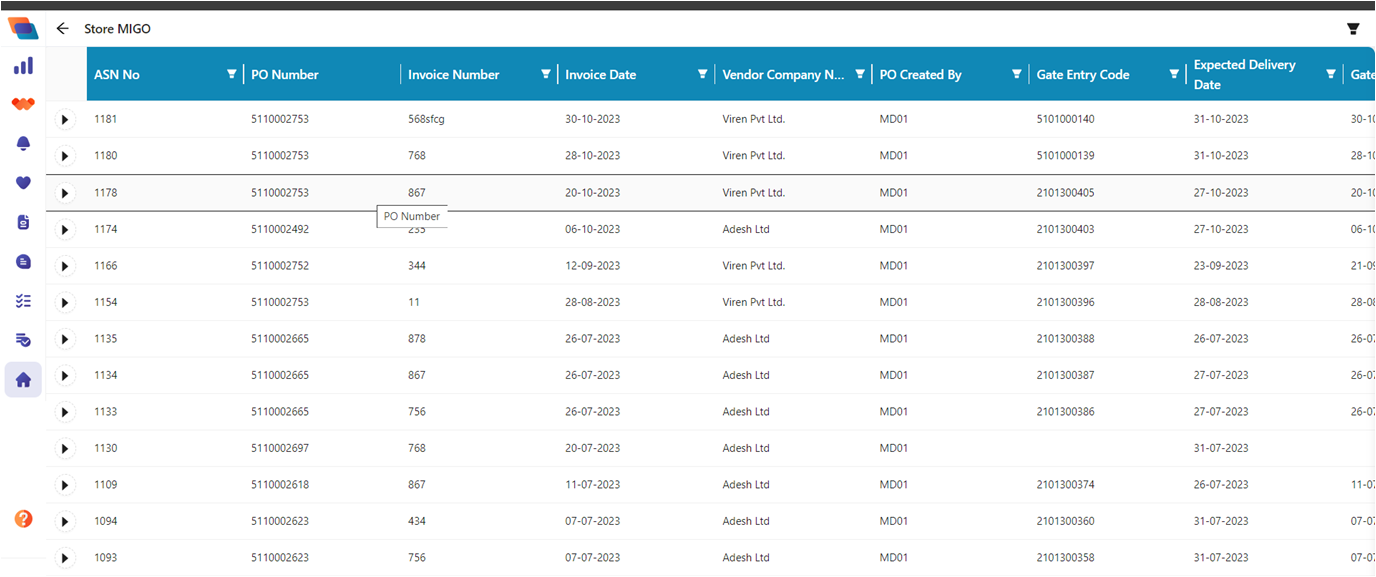
- Go to MIGO and select Store MIGO tile.
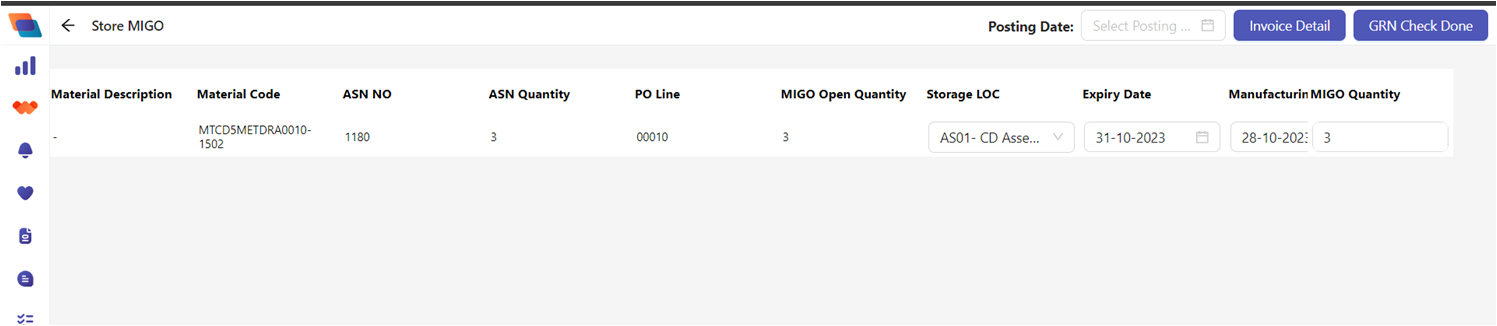
- Double Click on the ASN No., and a Store MIGO page opened
- Select Posting date : If the Store Certification and Gate entry is done by today / current day, on click GRN check done and create GRN number.IF, on the selecting previous day of Posting Date it do not allow to create GRN number due to the Store Certification and Posting date should be on the same day/ date.
- Select Storage LOC , Expiry Date, Manufacturing date and Supplier Batch.
- Then Click on the GRN Check Done, and Pop up appears with GRN Number (which is generated by SAP)
- Quality Process will be occurred by SAP on the base of GRN number and all the details show in the Live ASN tile L-5 Stage w.r.t. ASN number
Admin Account
- Go to ASN and select Live ASN tile.
- Here the admin received notification on every stage completion, so the L5 completion notification get by admin.
- In Live ASN the current stage show all the Level history
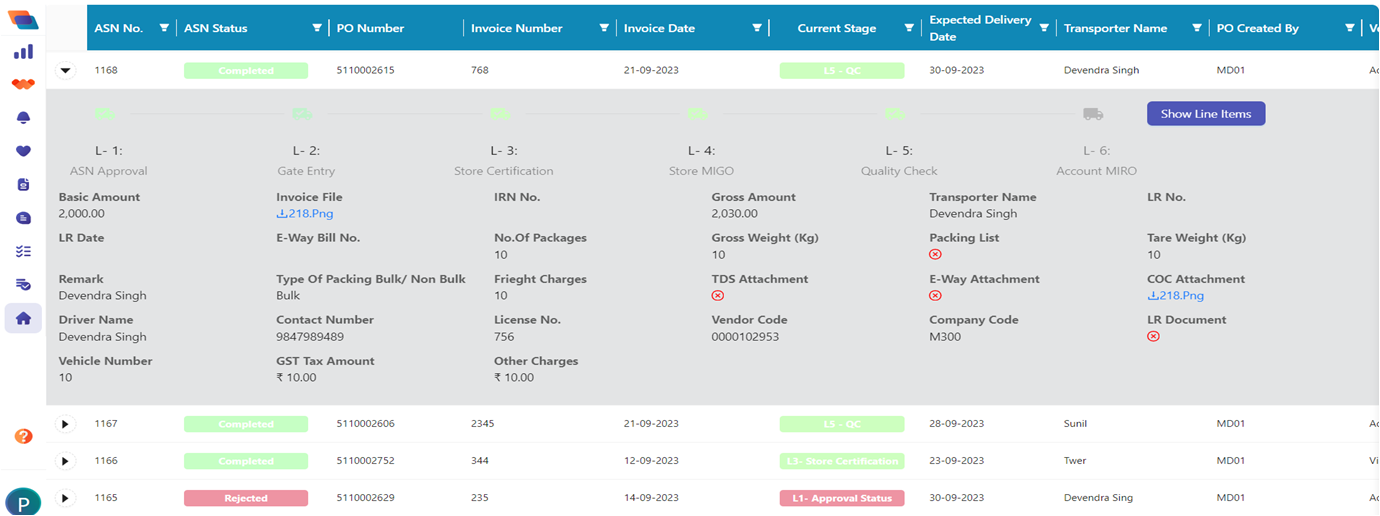
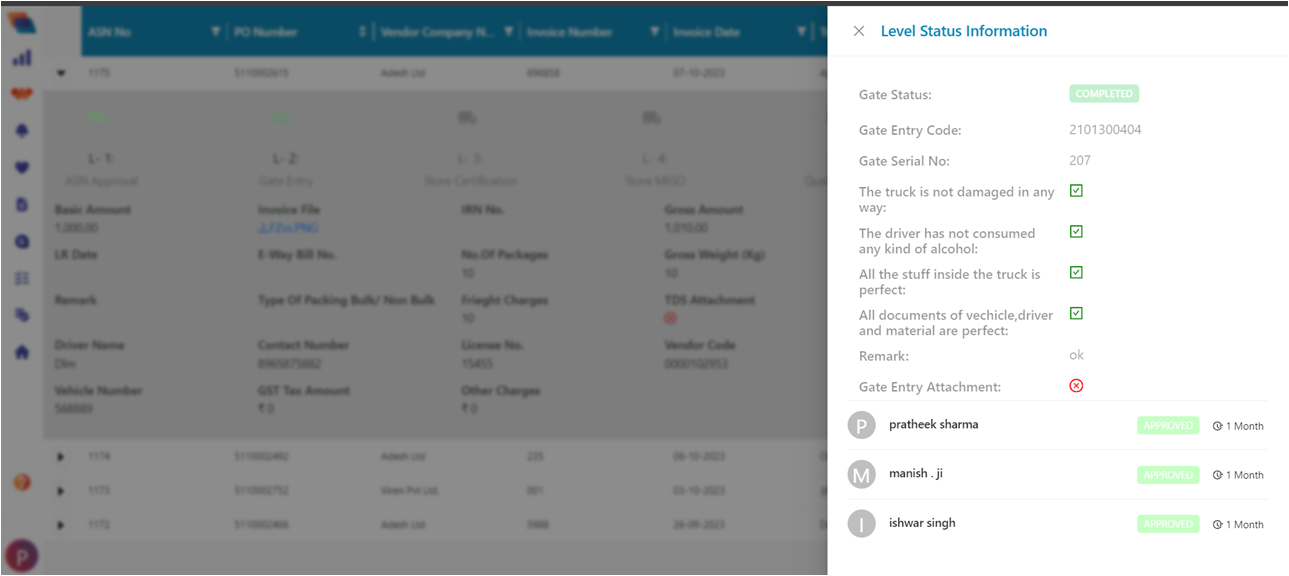
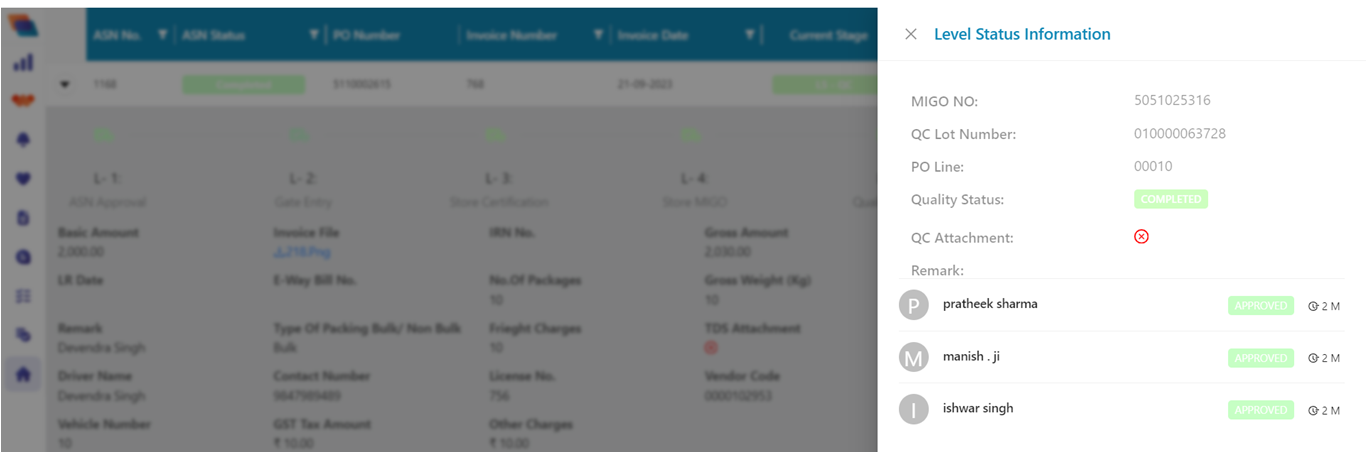
- Once the admin click on the L-5 truck icon here the admin can see the Level status information.
- Also the MIGO no., QC lot Number, PO line and Workflow approval on the different level.
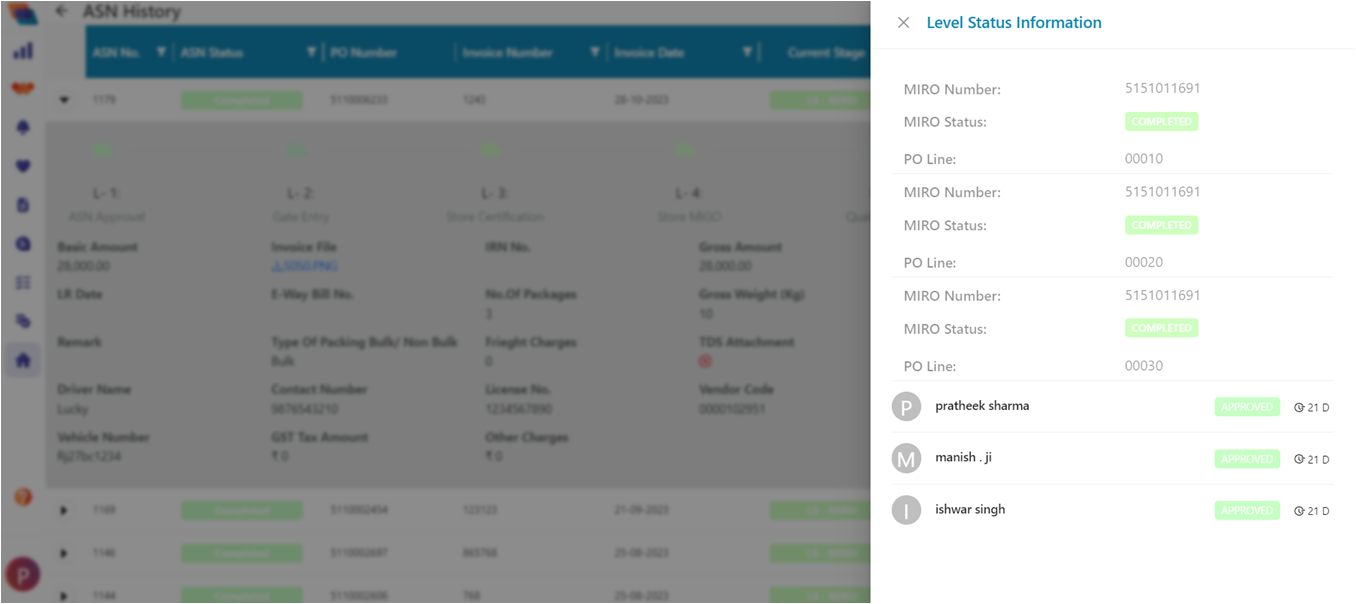
- For the next process of L-6 go to ASN history tile, because after L5 completion MIRO will completed through SAP.
- L6 Process completed by SAP, and once it completed then it shows in the ASN History Tiles.
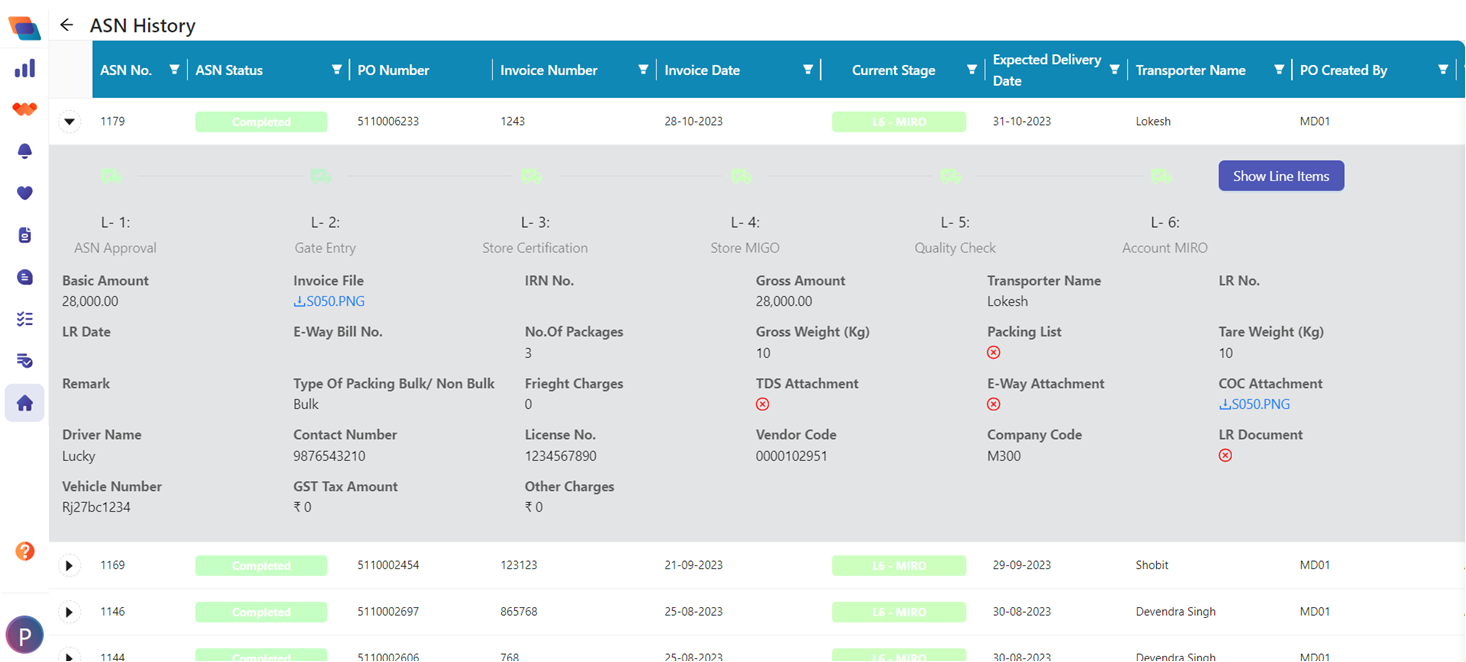
- Click on the L-6 Truck icon and the all Level status Information has been showed.

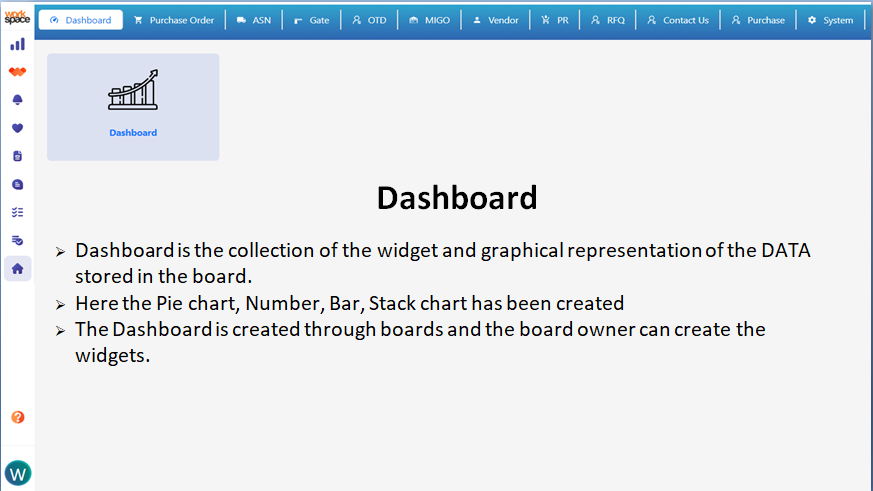
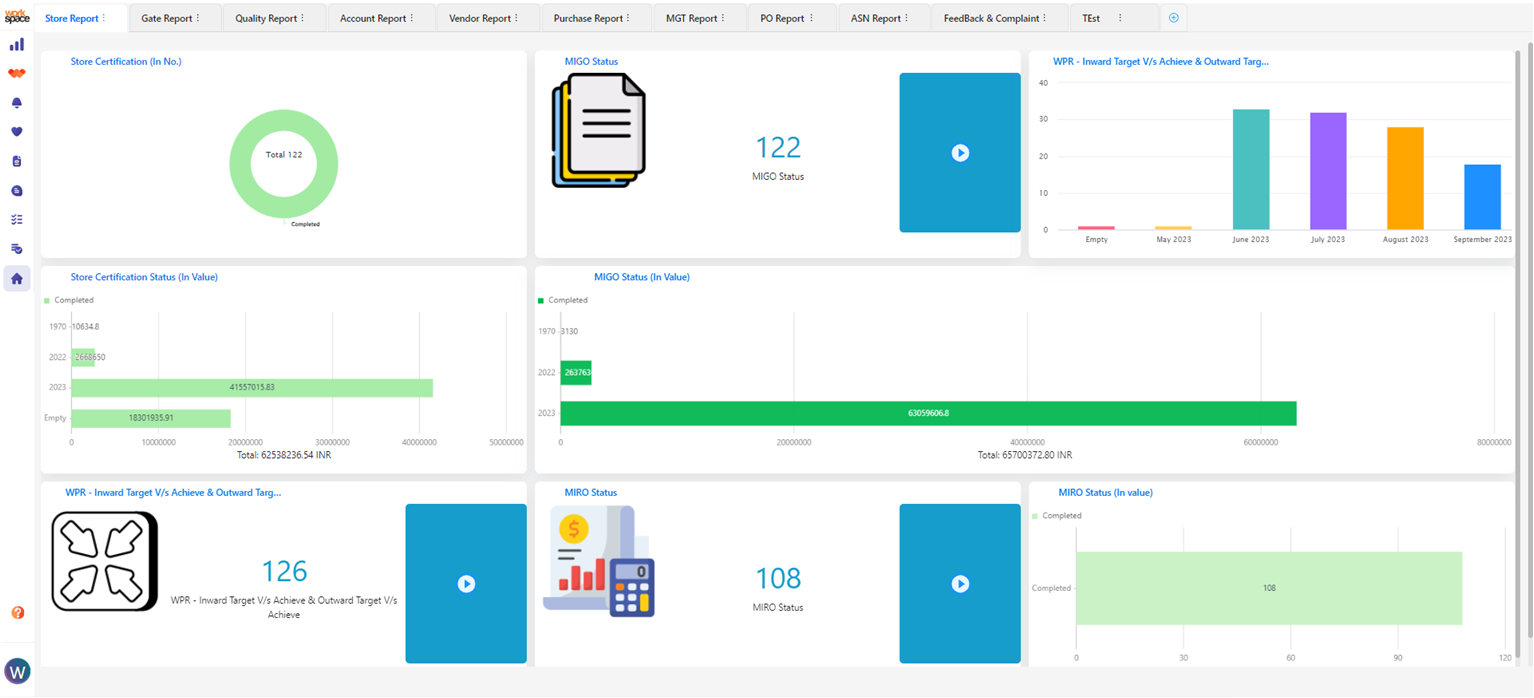
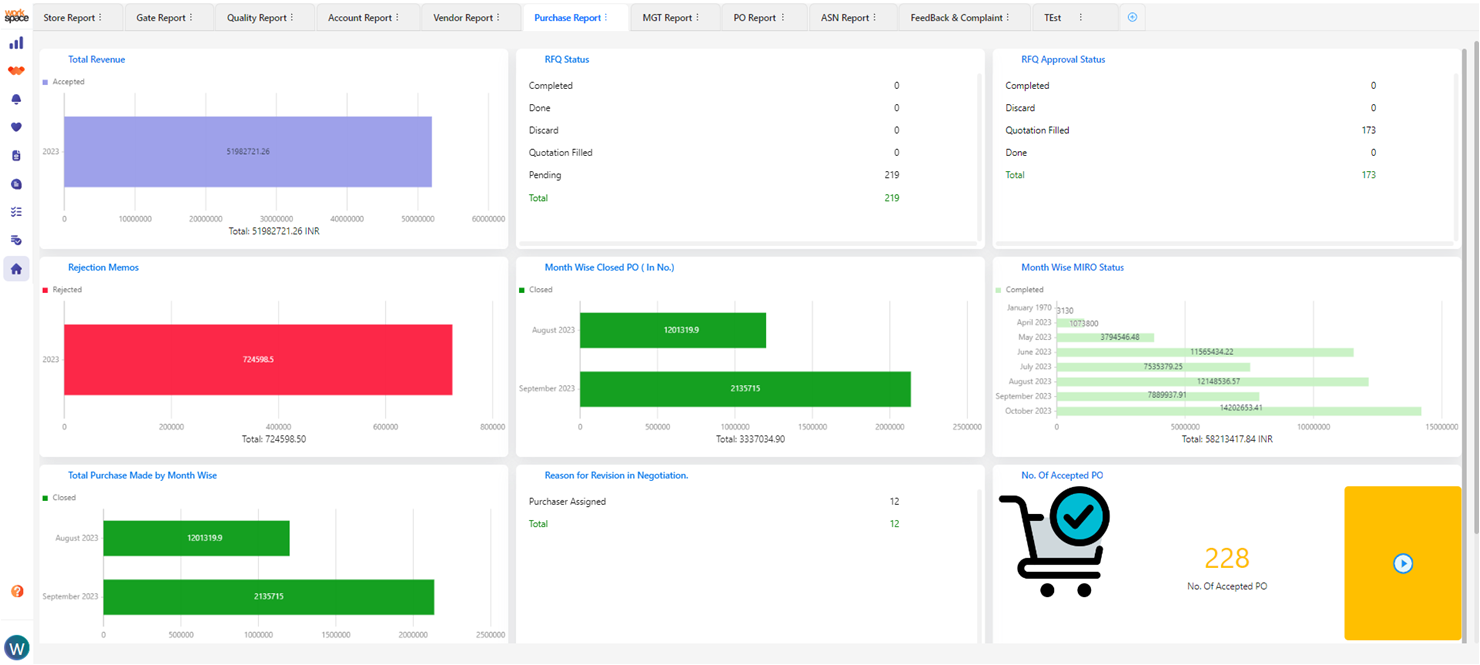
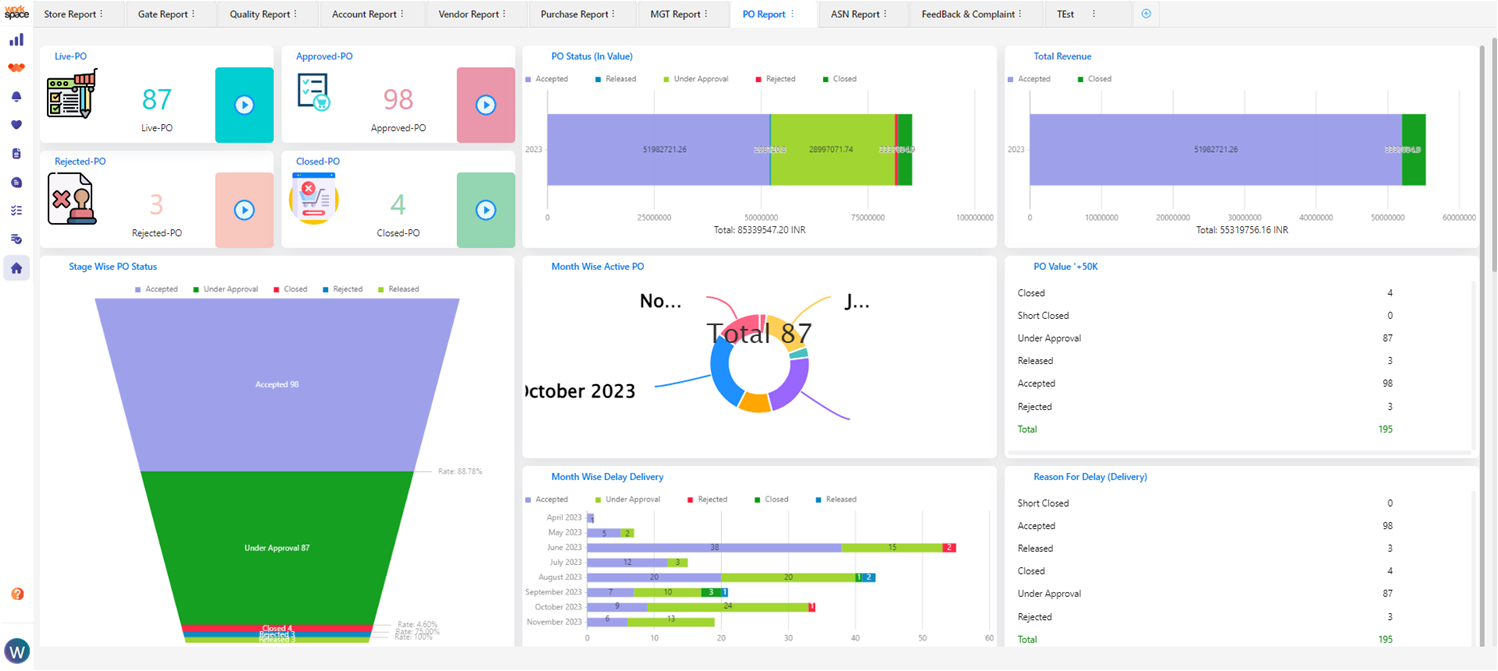
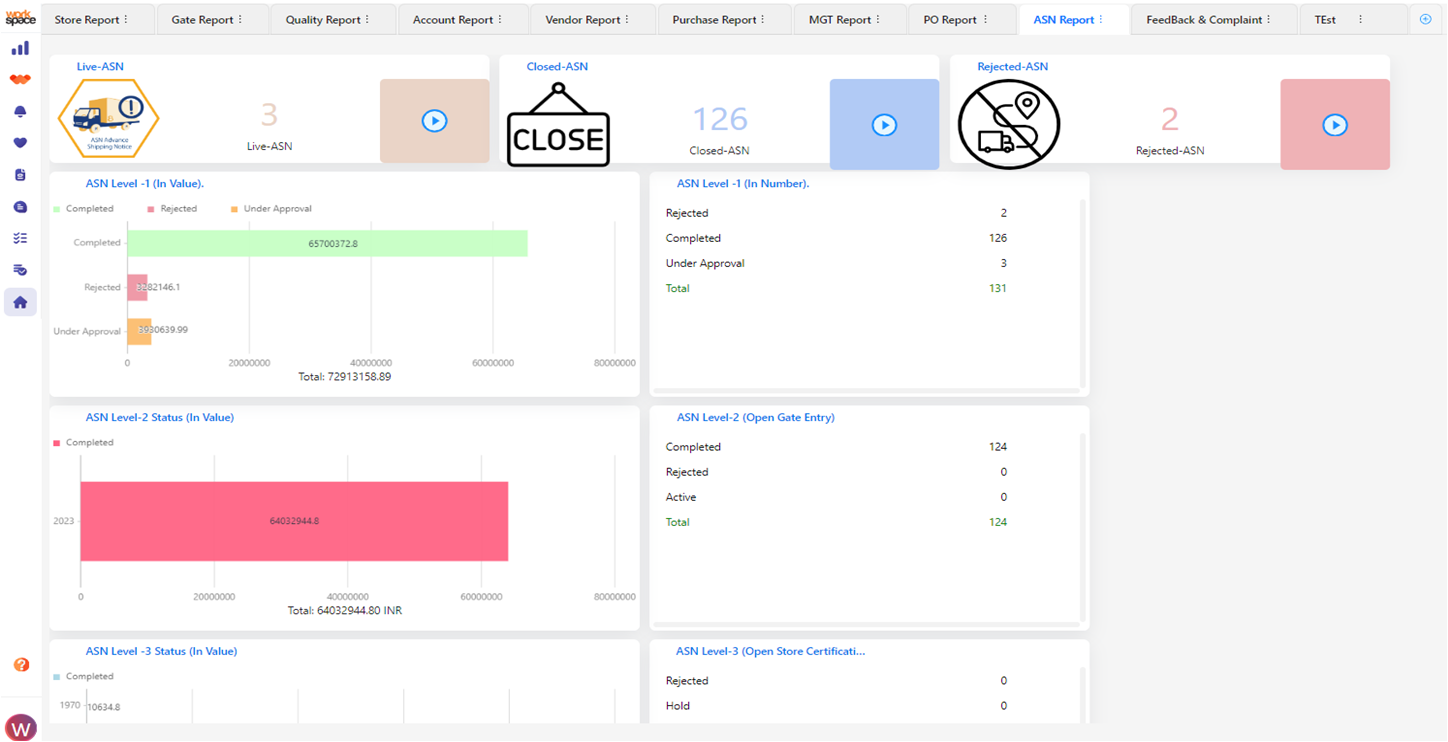
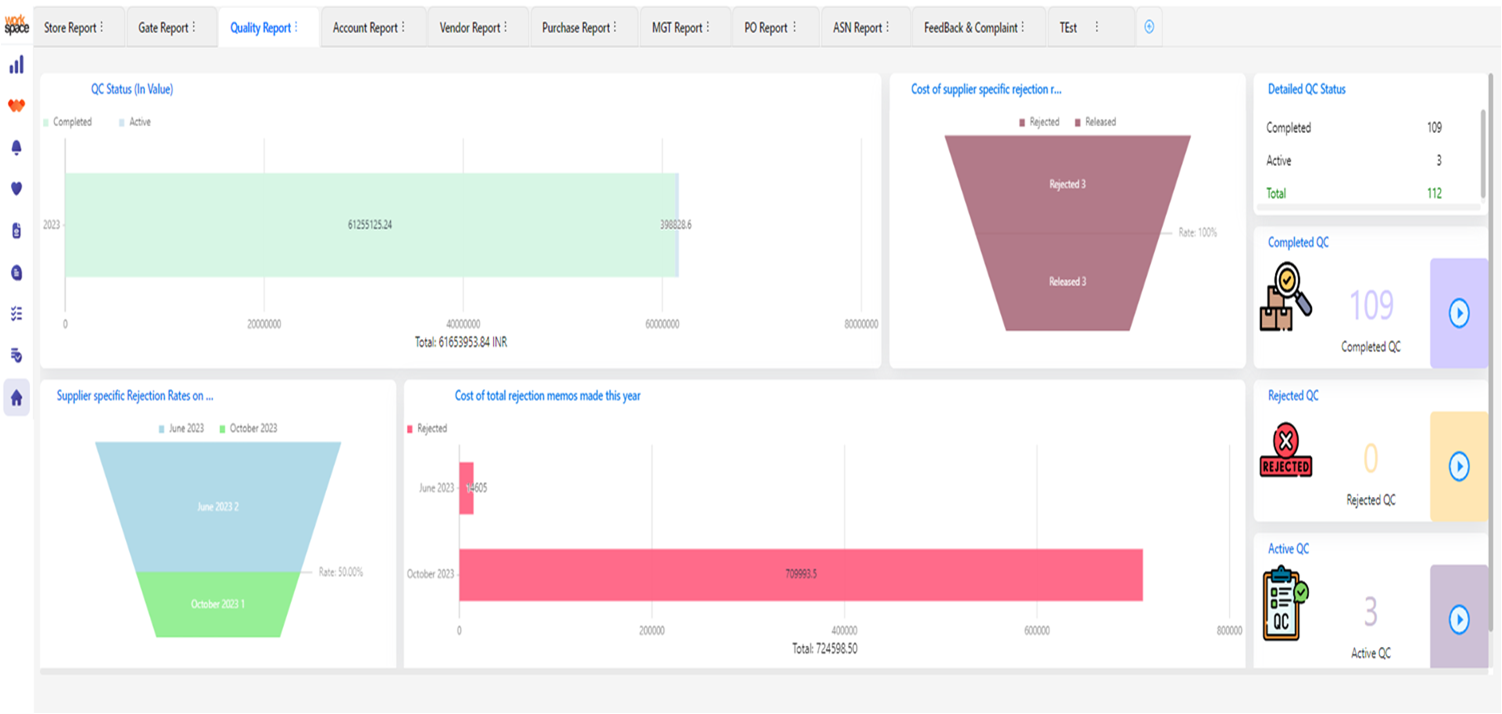
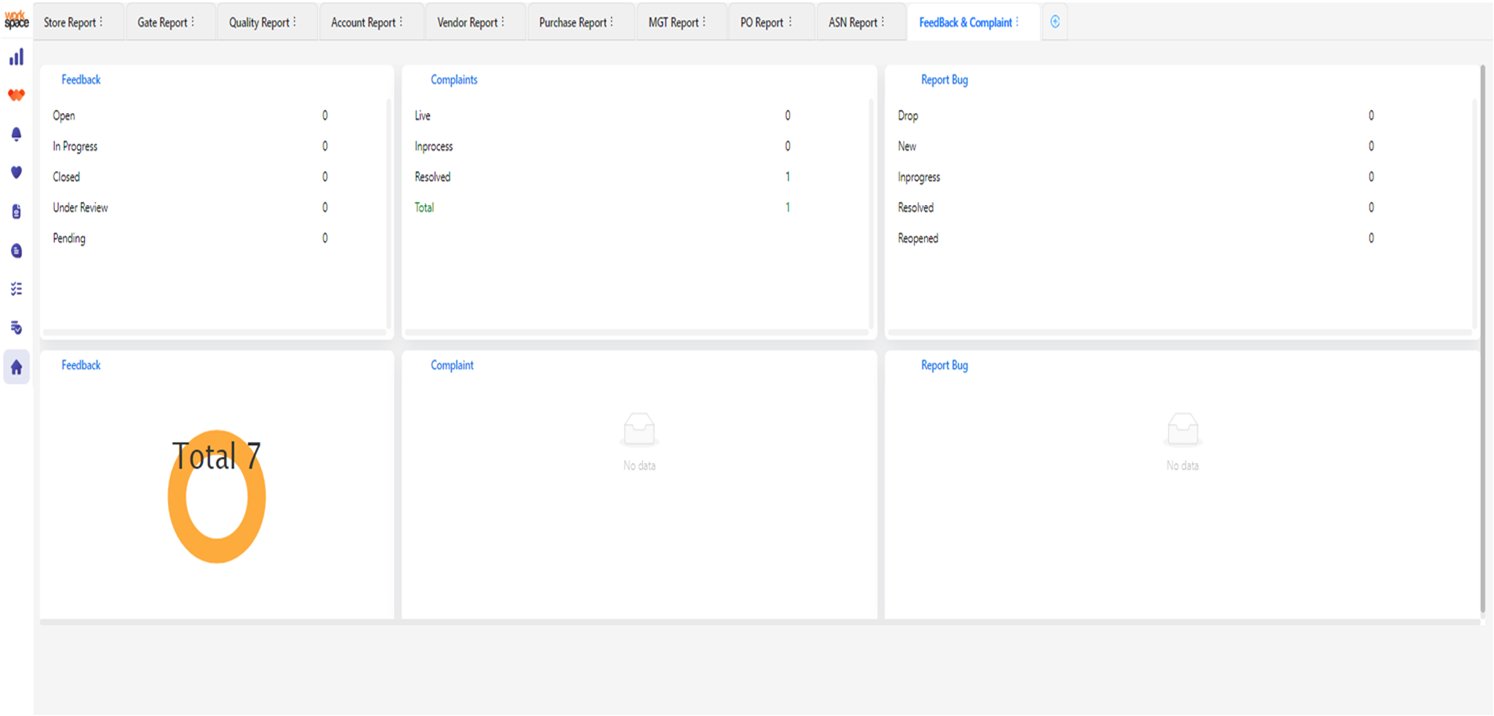
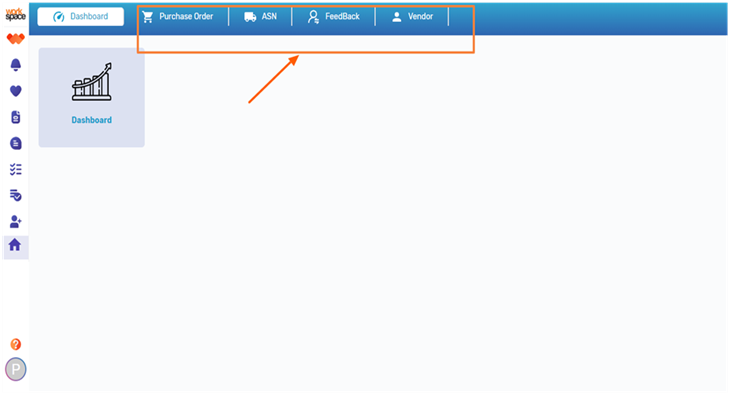
Dashboard